the space between

upcycle, repurpose and reinvent your space

  • about
  • aruba
  • key west
  • curacao
  • projects
  • house tours
  • privacy policy

DIY wood vanity in the master bathroom

October 6, 2014

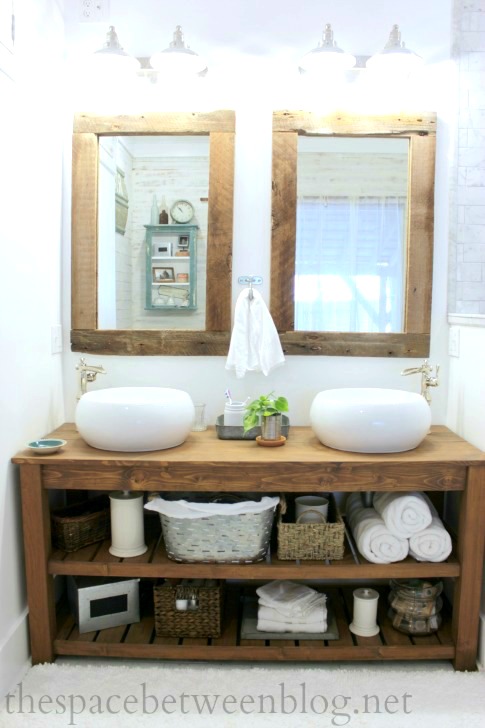
Pretty much from the outset of this master bathroom project I knew I wanted to make the vanity because the space was tight and the odds of finding a piece that would fit perfectly into it were slim.

rustic-bathroom-vanity-2

Turns out the odds of me making something that was a perfect fit were slim, too. But, man, did I try. And it was looking so perfectly-fit-like for a minute there. Such a long minute that I went so far as to declare it right here, with photo evidence.

DIY wood vanity

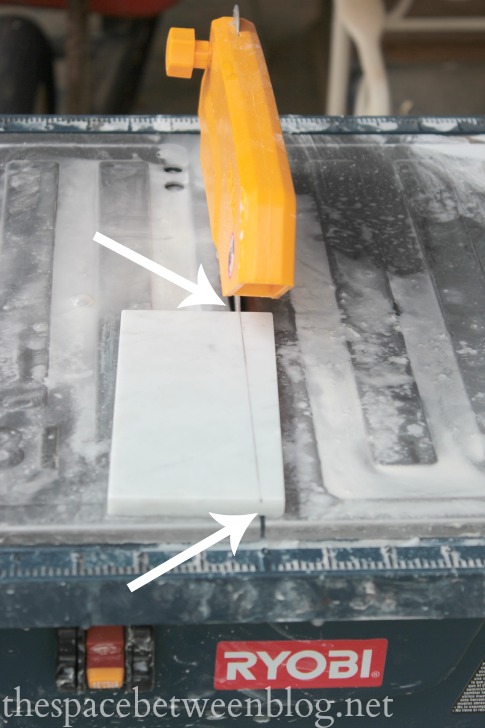
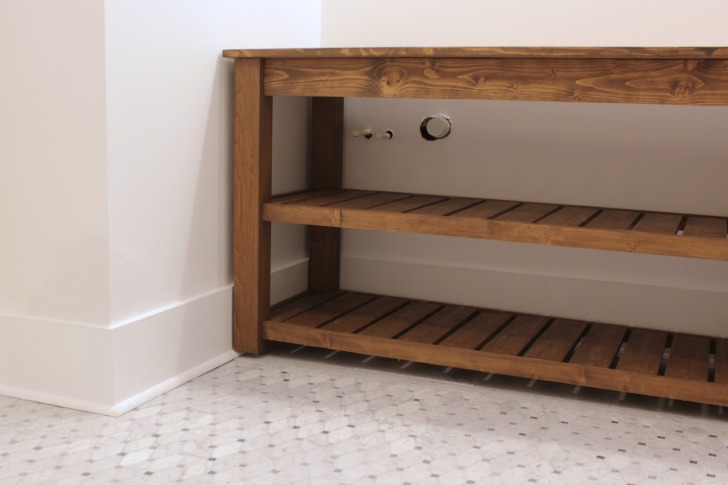
But you may notice there was only baseboard installed on the right side, and even though there is clearly plenty of room for baseboard on the other side, what there really wasn’t enough room for was the shoe molding, we use a basic quarter round, so the actual vanity install attempt looked like this.

DIY wood vanity

Can I get a womp womp? #BuzzKill

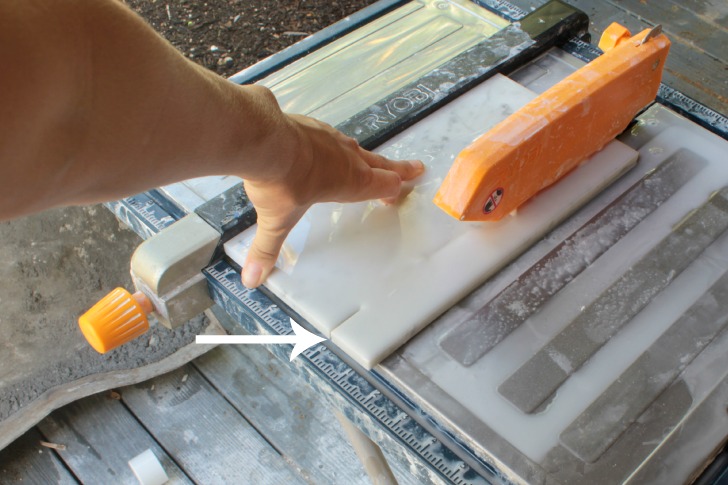
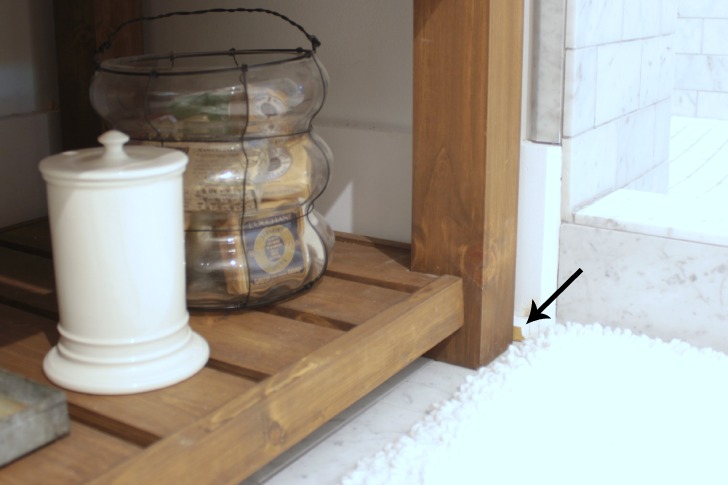
Lucky for us the right side of the vanity is just a half wall to the shower so I removed the quarter round on that side and we ran it through the table saw to slim it down about a 1/4″ and reattached it. It’s mostly hidden behind the vanity so if the touch up paint fairy would just come already no one would ever notice.

DIY wood vanity

So, true to form, this little DIY wood vanity didn’t turn out exactly perfect, but we were able to completely fill this little vanity nook to maximize the space in our bathroom. And with this little Key West house we can’t leave any space free to do its own thing. It has to serve a purpose for me, or I don’t want it around. ๐Ÿ™‚

DIY wood vanity

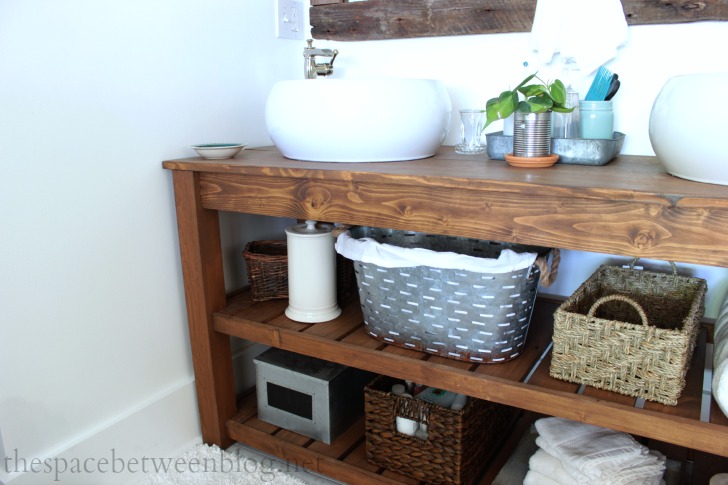
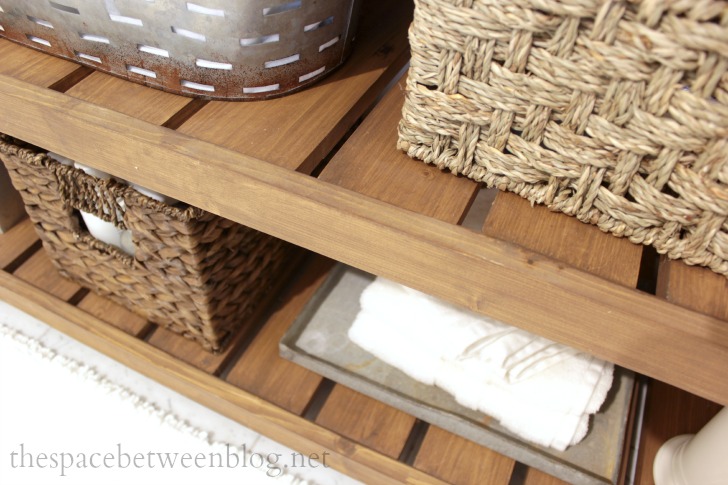
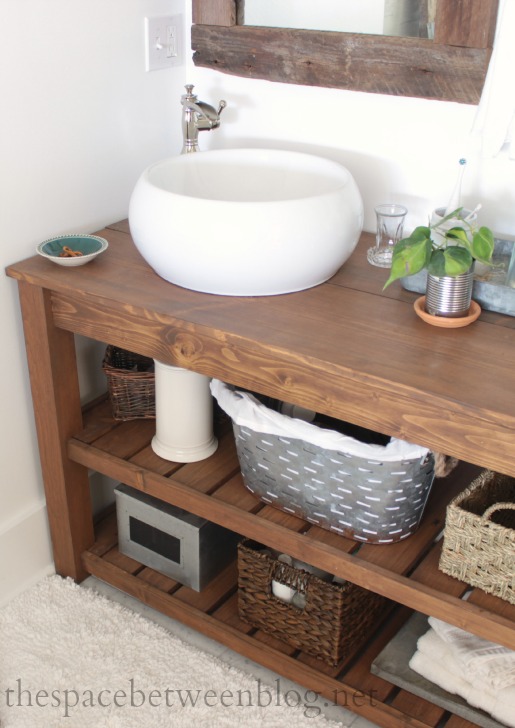
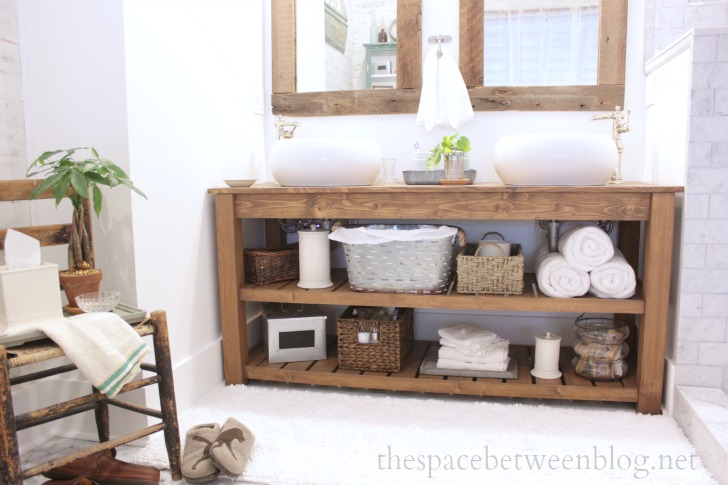
And here’s the thing about the design. I really, really, really wanted open shelves. That’s another thing about small spaces … we need the storage but too many bulky furniture pieces will just start to make the space feel tight and cramped. And I was kind of worried I was loosing storage space, but with the right mix of containers that can hide all kinds of necessities we have actually gained a lot of super convenient storage.

The galvanized bin on the top, I draped a white dish towel along the front to cover the holes because there’s all kinds of ugly crap in there that I need frequent access too. And it even has a small basket hidden behind it with things I don’t need to get at often. And the basket beside it is basically empty so we have room to grow.

master bathroom vanity area

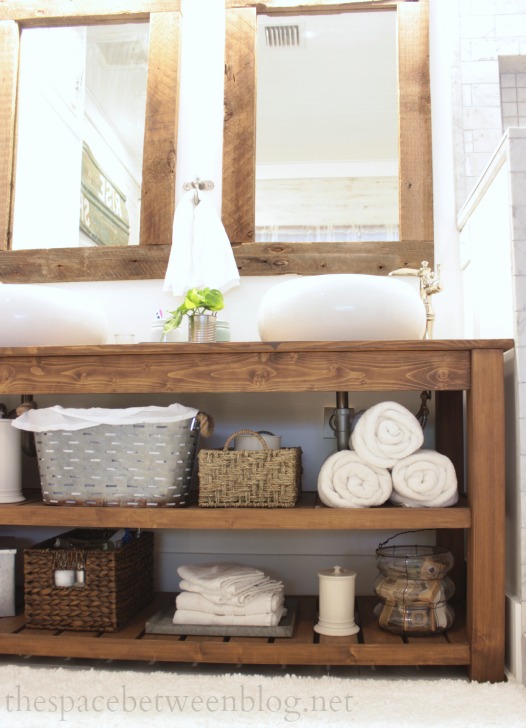
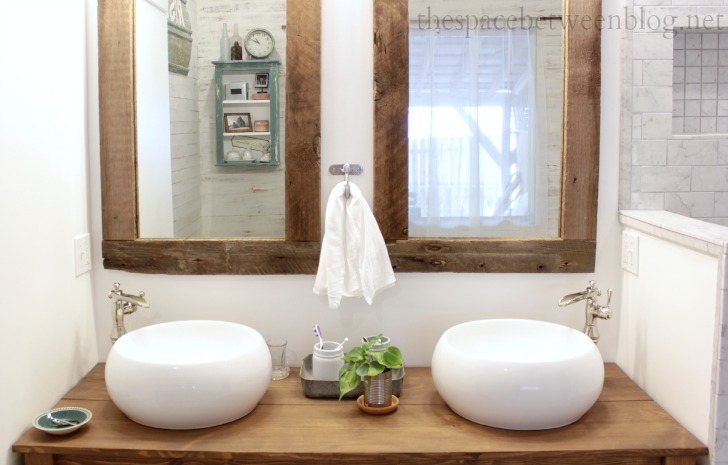
I think it has one of those teak counter feels to it, like it could be in a spa, which is exactly the feel I was hoping for in our master bathroom. Score one for the good guys!

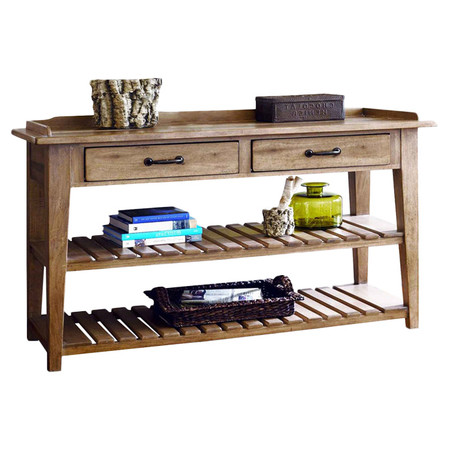
You may remember this was my inspiration pic from Joss & Main.

master bathroom vanity inspiration

And I made a few key changes for it to work for us.

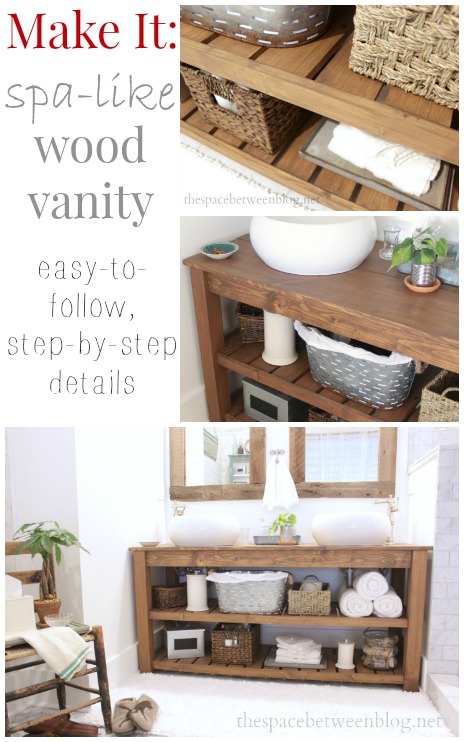
DIY wood vanity details:

  • I really wanted drawers but with the vessel sinks we needed the counter height to be lower so there just wasn’t enough room.
  • You could very easily make each shelf by overlapping the slats like the inspiration pic and just finish nailing them into the stretcher boards, but again with the vessel sinks and lower counter and I wanted the shelves as tall as possible so I used pocket holes instead.
  • I came thisclose to ordering this leg from Osborne Wood which would have been pretty much an exact match to the inspiration, but in the end decided I liked the clean lines of a straight leg and, I’m not gonna lie, the ease of assembly with no weird tapered angles to try to figure out was a key determining factor as well. ๐Ÿ™‚
  • That weird back and side piece on the counter … really just not necessary.

tips for tiling a bathroom with marble tile

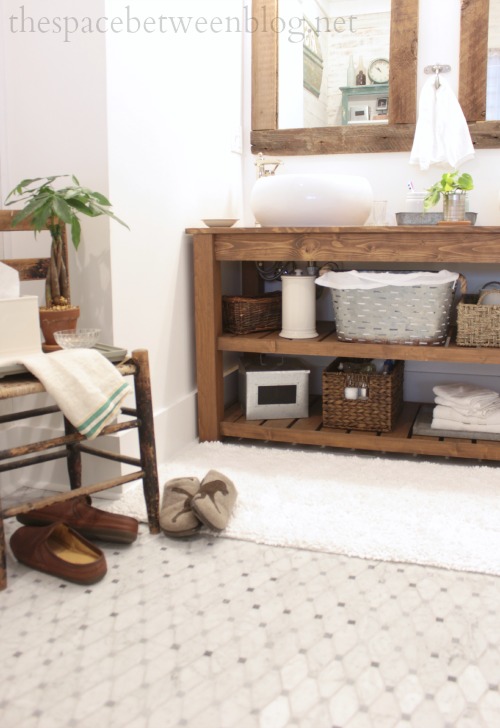
So here’s what you’ll need to make your own spa-like wooden vanity with wood slat shelves! The final dimensions of this exact vanity are 29 3/4″ high, 23″ deep and 63″ long.

Supplies:

  • Four 2 3/4″ posts, 29″ long (Osborne Wood sent me mine for this project)
  • Seven 1 x 4s, 8′ long (I used all knotty pine for this project)
  • Two 1 x 4s,10′ long
  • Two 1 x 12s, 6′ long
  • One 1 x 4, 6″ long
  • 150 grit sandpaper
  • 1 1/8″ screws (lots and lots of them)
  • 2″ screws (about 25)

Tools with affiliate links to products I use:

  • tape measure
  • miter saw
  • table saw
  • palm sander
  • Kreg Jig
  • screwdriver (this cordless impact driver is my new favorite to use for everything!)
  • jig saw
  • hammer or rubber mallet

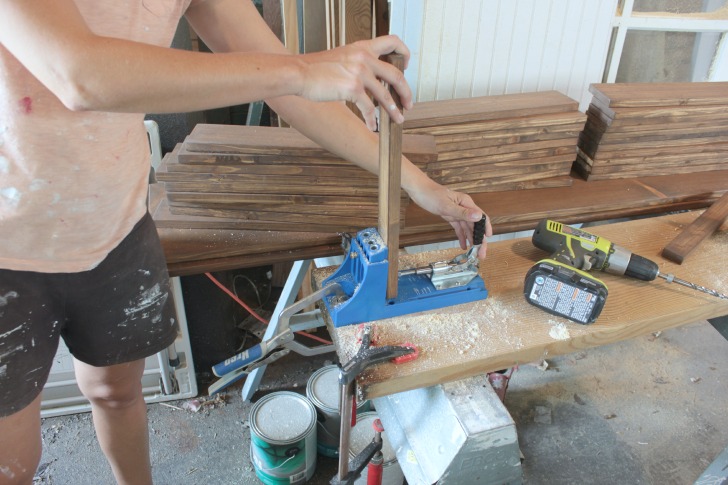
This is actually the first time I used my Kreg Jig. I used the Kreg Jig Jr for a lot of projects before. All of the projects with pocket holes that I made for the book were all made with the Jr … and I even made a whole bed frame with the Jr. And after Kreg Jig saw the bed they sent me the real thing … and I’ve stared at it in the case for about a year. But with 15 slats per shelf needing 4 pocket holes a piece plus a few more for the stretcher and apron boards … carry the one, and that equals a lot of pocket holes. So I clamped the Kreg Jig to a scrap 2 x 12 we had and clamped that to a sawhorse and got over my hesitation to try something new.

how to make a diy wood vanity with a kreg jig

But let’s start at the beginning.

Step 1 – Since there are so many separate pieces of wood that make up this vanity I knew I wanted to make all of my cuts first so I could stain each piece individually before assembling anything. I just think staining is so much easier this way.

So here’s your cut list (some basic building terminology is required here … very basic):

      • use your table saw to rip the two 1 x 4 x 10s and one 1 x 4 x 8 in half lengthwise (these will become your stretchers and aprons
      • use your miter saw to cut the remaining 1 x 4 x 8s into 18″ lengths (these are the slats for each shelf, make them 5″ shorter than the finished depth if your legs are also 2 3/4″)
      • use your miter saw to cut the 1 x 12 x 6s into 63″ lengths (these are the top of the vanity, make them the full length you want your finished vanity)
      • use your miter saw to cut the 1 x 4 x 6 to 55 1/2″ (this is your front apron, make it 7 1/2″ shorter than the full length if you legs are also 2 3/4″)
    • use your miter saw to cut the ripped pieces as follows:
      • 5 @ 55 1/2″ long (these are your front and back stretchers and your back apron)
      • 6 @ 15 1/2″ long (these are your side stretchers and aprons)

Step 2 – Give each board a light sanding with the 150 grit sandpaper just to smooth out any rough edges.

Step 3 – Get busy staining. And try not to be jealous of my luxurious work space. Mico is not quite sure what to think of it either.

staining wood for a diy vanity

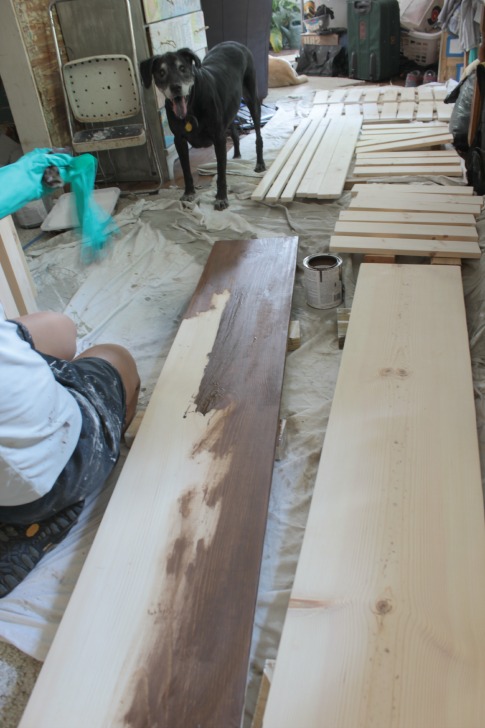
I used the same stain brand and color we used on our floors,ย ZAR, modern walnut. I put one coat of stain on all sides of each piece and then applied a coat of clear wax. You might want to polyurethane or clear coat your vanity but the clear wax has worked well for us so far.

Step 4 – Drill your pocket holes. Each board, except for the top pieces and the legs, need two pocket holes in each end.

use a Kreg Jig to make quick pocket holes for a sturdy assembly for your wood furniture pieces

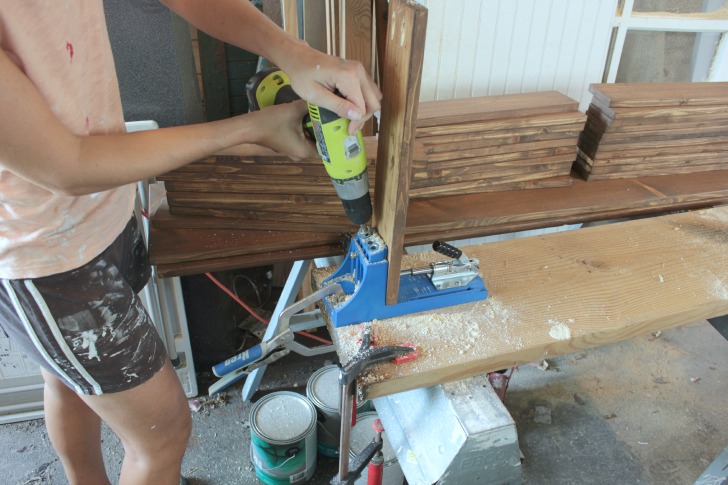
How the Kreg Jig was a huge time saver over the Kreg Jig Jr was that I could clamp a board into place once and drill both of the pocket holes for that end. This step is more time consuming than it is difficult. Just clamp, drill and repeat again and again and again. And be sure to drill your pocket holes into the same side of each board. That’s a no-brainer, but something I was pretty sure I would do if I didn’t pay close enough attention. ๐Ÿ™‚

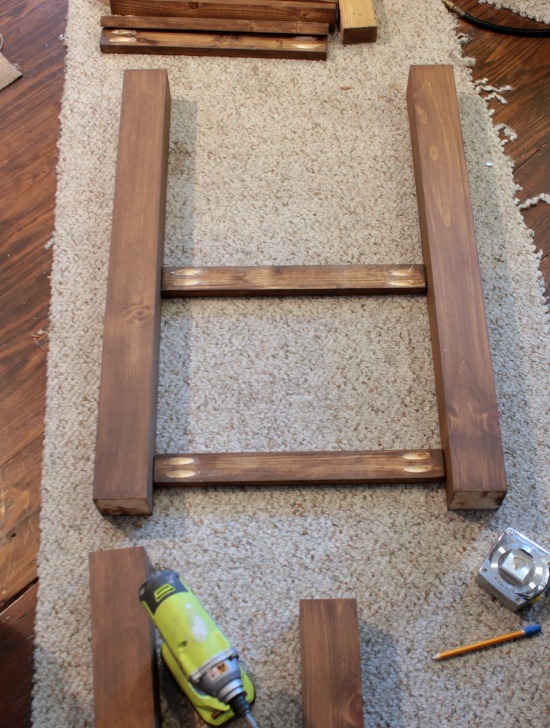
Step 5 – Assemble the legs. Measure and mark 1 1/2″ and 15″ from the bottom of each leg. Attach the side stretches (with the pocket holes facing into the vanity) flush to the outside of the legs above these marks through your pocket holes. And attach the side aprons flush with the top of each leg (not shown in picture).

use a Kreg Jig to make quick pocket holes for a sturdy assembly for your wood furniture pieces

Step 6 – Assemble the shelves. I used a 1/4″ scrap of lauan so the slats would attach to the stretchers 1/4″ down from the top and a 1/2″ wide scrap piece of wood to space each slat equally apart. And make sure the pocket holes in both stretcher pieces are facing the same direction, so they will end up facing the back of the vanity when its all said and done.

DIY wood vanity

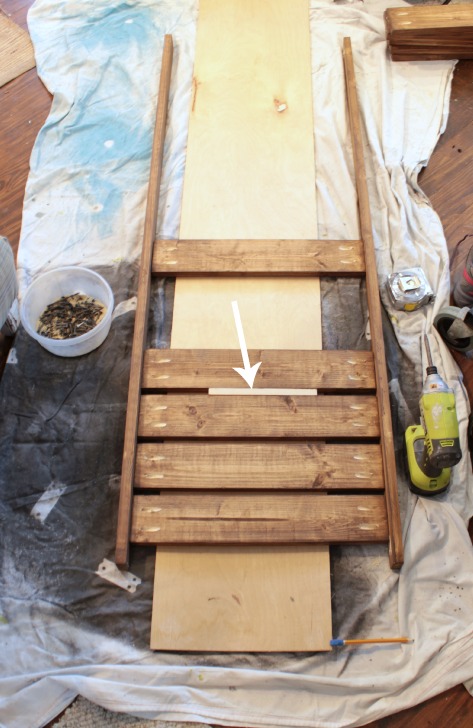
Here’s where the measurements get really particular. Since I decided on the size of my vanity based on the size of the space it is going in I needed to get creative with the spacing of the slats on each shelf. What worked for my vanity is to space each slat 1/2″ apart, but the space between the two end slats and the slats next to them is only 1/4″ and those end slats will butt right up to the side stretchers that you’ve already attached to the legs. You might need to take some time to make your spacing work for your vanity.

And when assembling each shelf, figure out where the two slats at each end of both shelves will go, but don’t attach them yet, they need to get attached after you assemble the shelves to the legs so you can access the pocket holes.

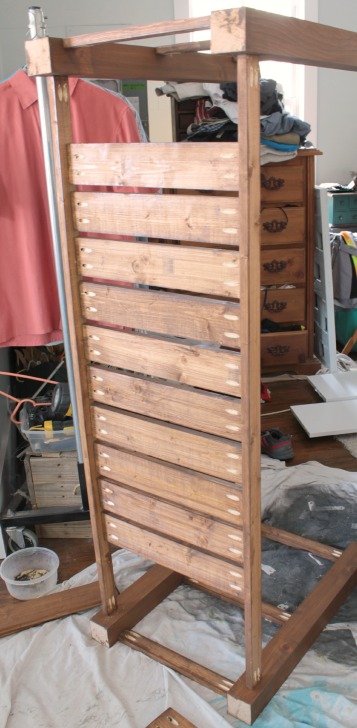
Step 7 – Attach both shelves to the legs. These measurements work so that the shelves will indent the legs about 1″. I attached the bottom shelf first but if I had it to do again I’d attach the top shelf first. And I find it easier to lay the legs on the ground and line the shelf up to them so you can drill straight down into your pocket holes.

DIY wood vanity

And again, don’t worry about how awesome my work space is, I understand not everyone can be so lucky. ๐Ÿ˜‰

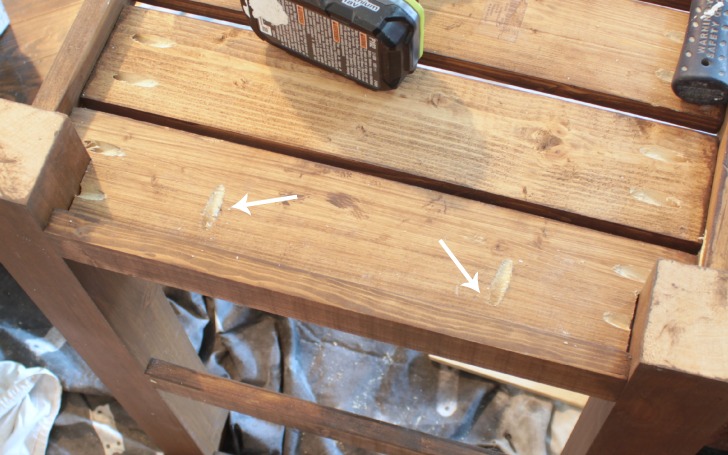
Once each shelf is attached flip the entire piece upside down and attach the last slats to each shelf, you may need to use a mallet or hammer to nudge them into place.

DIY wood vanity

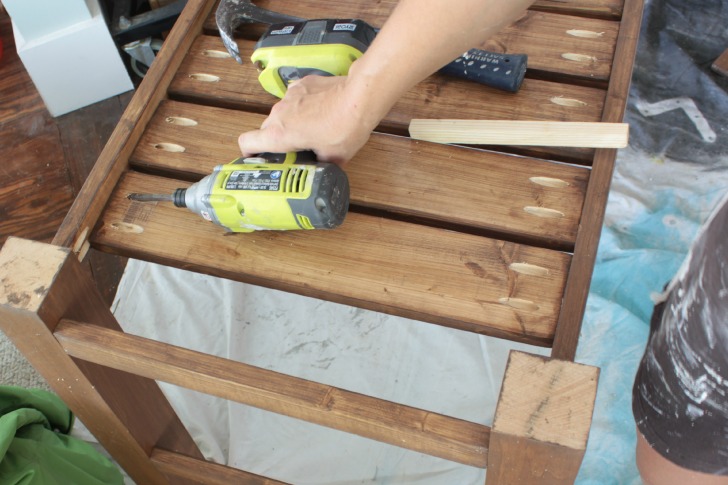
The last slat on each side of both shelves will need to be cut with a jig saw to fit around the legs.

make a spa like diy wood vanity

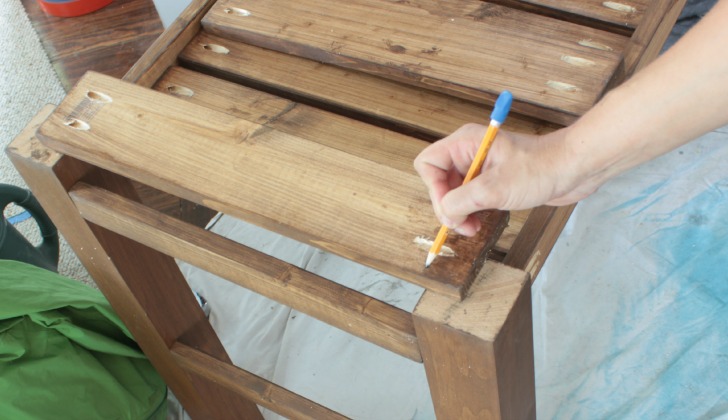
And since cutting the notches out of those slats made one of the pocket holes at each end unusable I drilled two more pocket holes so those slats could also be attached to the side stretcher.

make a spa like diy wood vanity

Step 8 – Attach the front and back apron to the legs through the pocket holes making sure the pocket holes face the back of the vanity.

Step 9 – Attach the top. I know a wood vanity top isn’t for everyone. But this is our master bathroom and Joel and I tend to not have water fights in here so I’m not really concerned about water exposure beyond what the clear wax can handle. But, long term I would actually love to try my hand at making a concrete counter top for in here. For now, these two 1 x 12s attached through pocket holes into the apron work for us.

make a spa like diy wood vanity

How’s that for a little DIY? Beyond the cutting and staining time the actual time to assemble goes by pretty quick and I did it all with my own two hands, although it would be helpful to have an extra set of hands when it comes to attaching the shelves to the legs.

make a spa like diy wood vanity

I debated using the Driftwood color stain that I used on our wood bed frame, but I like the contrast the darkness of the Modern Walnut has against all of the light and white elements in the room.

make a spa like diy wood vanity

And there were way too many discussions about the final height of the vanity with ridiculous enactments of how high we would have to lift our arms to wash our hands in the vessel sinks. Seriously, that’s the kind of thing we do for fun around here. Rumor has it that a standard vanity height is 32″ but is raised to a stately 36″ in a master bathroom. Our vanity measures 29 3/4″ high with the height of the top of our vessel sinks at 37″. It seems just right to us.

make a spa like diy wood vanity

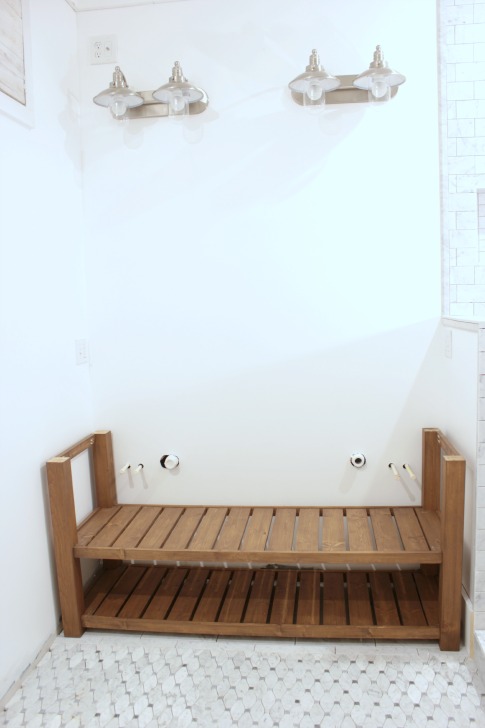
It’s hard to remember that this space used to look like this.
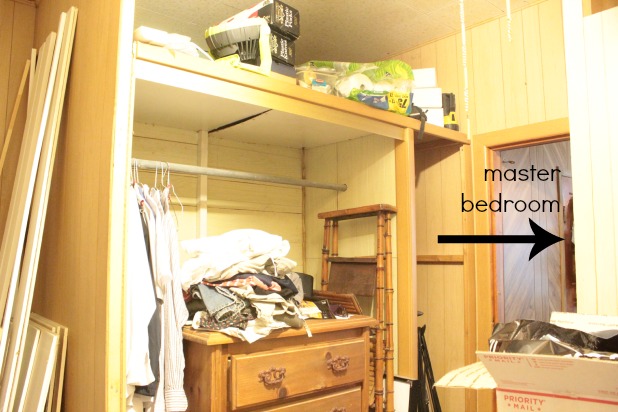
master bathroom before

Say whaaaaaat?


a detailed tutorial for making your own wood slat vanity, would also make a great console table

cutting, grouting and sealing marble tile tips

October 2, 2014

Hey, thanks for all the great comments on the post about tiling a bathroom, anyone getting ready to tackle their own tile project can give me a shout if you have any other questions. I definitely have all the answers. Or something.

I got so wordy about tile I had to separate these cutting, grouting and sealing marble tile tips into their own post. What you’re not going to find are your typical how to lay tile details, well, just to cover those basics:

  • start with cement board (more on that here)
  • create a shower pan if you’re tiling a shower (more on that here)
  • use thinset mortar (more on that here)
  • spread the thinset with a notched trowel (more on that here)
  • and lay your tile as even as possible (more details on supplies and techniques here)
  • be sure to admire your work because this can be a daunting task

But it seems like the little details we encounter along the way get skipped right over when people are writing tutorials so that’s what I really want to focus on with some affiliate links to the products I used.

all kinds of great tiling tips for your next tile project ... this one is specific to marble tile in a master bathroom but great info for any tile project

Tile Cutting Tips:

  • I used the 7″ Ryobi wet saw with a stand to make every cut and didn’t have a need for any nippers. If you’re working with larger tiles you may want a larger tile saw.
  • A regular pencil worked fine to mark the tile. It didn’t get washed off by the wet saw and it rubbed right off after.
  • Be sure to line up your mark with the correct side of the blade. This is true for all cutting, the blade takes about 1/8″ out of what you’re cutting so be sure it comes out of the scrap side and not the piece you want to use.
  • Sometimes you can’t use the wet saw guide when making irregular cuts (like to make sure the first row of tile is level). For these cuts mark a full line on the front of your tile and not only line the mark up with the blade but also line up the front of the tile with the front of the wet saw.

tile cutting tips

  • You want to make all of your cuts with the front of your tile facing up, but it is common that a small piece of tile will break off when you get close to the end of your cut. To prevent your tile from breaking, start by making a short cut with the back side of the tile facing up, then flip the tile over (so the front is facing up) and start the cut from the other end of the mark. Your tile won’t chip or break where your two cuts meet.

tile cutting tips

Let’s be honest, don’t worry about this for any cut that will get hidden under your baseboards, this is only something we did for cuts that would be seen, like where the Gray Dot Long Octagon tile met the 6″ x 12″ tile in the doorway and the tiles along the top of the shower curb.

tile cutting tips

  • The Gray Dot Long Octagon tile that we used for the floor (and the 2″ x 2″ tile we used in the shower pan) come assembled with a mesh backing in pieces that are about 1 square foot. They also come with a paper backing on the mesh, it was much easier to cut the mosaic sheets without the paper backing. Just a little FYI if you’re using mosaic tile also.

long-octagon-tile

Tiling a Floor: (Check out this post for tips on tiling a shower.)

  • If you’re working with a wonky old house like we are chances are your walls aren’t completely square. Thank you home builder. But, beyond some additional measuring this isn’t really a big deal. For floor tile specifically, I just picked a highly visible area of the floor I wanted to be sure ended up looking nice and marked a straight line parallel to another visible line in the room. Which for us was the shower curb.

tiling a floor with mosaic tile

If you’re working with a smaller floor with only one real visible wall I would just start tiling along that wall. The tile will look square to the room since it lines up with the one visible wall. For our bathroom, the wall to the left is hidden behind the tub, the wall to the right is hidden behind the vanity and the wall in the back is hidden behind the half wall to the toilet area. The only important “wall” to line up with was the shower.

  • Start by laying the tiles in a straight line along your mark on the floor.

tips for tiling a floor

  • If you’re going to tile the whole room in one day, be sure to leave yourself a way of out the room. I started in the center of the room, then tiled on the right (away from the doorway exit). We used the 6″ x 12″ Carrara marble tiles under the vanity area because they were going to be hidden anyway and I didn’t want to waste the beautiful long octagon tile … those tiles are cheaper too so it’s a great way to save a bit of $$.

tips for tiling a floor

Then I tiled behind the half wall in the toilet area, then along where the tub would be back toward the door and out of the room.

  • With the mosaic tiles keep a pair of scissors handy. We had to piece different sections of tile together in spots and sometimes it was just easier to work with individual tiles than the full sheets. It was also easier to cut the tiles for around the drain holes when the tiles weren’t attached to the mesh and other tiles.

tips for tiling a floor

  • And if you’re using a mosaic tile with little pieces of tile mixed in, like a gray dot for instance, be sure to push each piece into the thinset. You may end up needing to re-secure those little pieces if you don’t make sure of this while you’re tiling. I would assume. ๐Ÿ˜‰

Grouting Tips:

Grouting was actually the part I was dreading the most, I just had bad memories of tackling this all on my own in a previous house. But I have a GAME CHANGING tip and it is so little, but so HUGE for any tile job that is bigger than a few square feet. For this project I used this grout in the Delorean Gray color. For general grouting tips:

  • Clean the tiles and lines thoroughly before starting, this handheld vacuum worked great.

cleaing-before-grouting

  • I paid a little extra for a higher quality floatย and it is still in near perfect condition. I was worried with all of the tips and edges of the mosaic tile that I would scrape and gouge and ruin the float. The higher quality option held up perfectly.
  • Be sure to fill the gaps between each tile with as much grout as possible. Grout will shrink a little when it dries so this helps reduce any little groutless spots.
  • For corners and edges where tile meets trim or something other than tile (and for any spots that just need another dab of grout) there is a grout caulkย that matches the grout colors and is easy spread in those little areas.
  • Knee pads – I’ve mentioned it before, but the old pair we had finally bit the dust. Actually they started pinching on the back of the knees so I begged and pleaded with Duluth Trading company and they sent me this pair with hinged backs and gel and leather knee supports. They are so awesome!
  • Have multiple buckets of water, each with their own sponge and someone else to rinse them out and refill with clean water. (This is THE game changer!)

tips for tiling a floor

I can’t over-emphasize this tip enough. And I know it seems simple, but having to get up and rinse out your sponge and refill the bucket just takes you out of your rhythm. When I explained to Joel my plan he declared himself my “Bucket B!tch” for the day. It was awesome and went by so much quicker.

Now, as for sponging strategy here’s what seemed to be quick and efficient:

  • grout about a 2 x 2 foot area at a time, more if you have less grout lines than the bajillion I had per square foot ย ๐Ÿ™‚
  • use a sponge and bucket of water to clean up the excess grout from each grouted area about 3 separate times (any more and the grout will become watery and any less and you will be left with a lot of grout haze)
  • grout another 2 x 2 foot area (while your bucket b!tch cleans your water and sponge)
  • use the clean sponge and water to first go back over the previous 2 x 2 foot spot to get it more clear and then to start to clean the second grouted area
  • grout a third 2 x 2 foot areaย (while your bucket b!tch cleans your water and sponge)
  • use the clean sponge and bucket for a third time, just one clean swipe, over the first area you grouted

grouting tips

We had three buckets and sponges but we probably could have done it with two most of the day. But if you’re bucket b!tch is going to lose interest in their job and make themselves useful around the house doing things like dishes and feeding the dogs and other various items of distraction stick with three. ๐Ÿ™‚

Marble Tile Specifics:

  • Marble is natural stone so it absorbs moisture and grays when wet, the tiles will take a couple of days to dry out and get back to their original color, wait until the tiles dry out before you seal them so you don’t lock in the color variation. You can kind of see in this picture that even though the shower pan tiles have natural color variation they are lighter than the wall tiles appear because they are dry and the thinset behind the wall tiles is still wet so the tiles appear grayer.

tiling tips

  • Because marble is a natural stone and will absorb color you need to seal them before you grout to prevent the grout from discoloring the tile. I used this sealer and just put it in a spray bottle and sprayed three coats on the ungrouted tile.

sealing marble tile

Then I used a grouting sponge to wipe off any excess. You know when it is completely sealed when the tile stops absorbing the sealer. After three coats I also dripped some water on the tile to make sure it would bead up and not absorb into the tile. You can’t see the water on the sealed tile because it wasn’t absorbed and didn’t discolor the tile, but the tile on the curb that I also put water on wasn’t sealed so you can see the difference.

sealing marble tile

  • Marble is very brittle so if you’re the type to freak out about every little scratch or imperfection this might not be the tile for you.
  • Any natural stone is also going to have some color variation, if you like complete uniformity, marble might not be the right tile for you.

I think that about covers it. Once you reach this stage in a room renovation you really do reach a turning point. Take a deep breath and give yourself a pat on the back because you’re in the home stretch!


so many great, detailed tips for tackling your own tile project, everything from cutting, grouting and sealing tips you don't want to miss

Now tell me what I missed. I know a bunch of you have done your own tile projects, what are your secret tips?

  • « Previous Page
  • 1
  • …
  • 15
  • 16
  • 17
  • 18
  • 19
  • …
  • 169
  • Next Page »

Copyright © 2025 · custom theme design by this bold girl · Built on the Genesis Framework 

  • pinterest
  • facebook
  • instagram
  • rss