This post may contain affiliate links which won’t change your price but will share some commission.
Refinishing old hardwood floors?
Here are some great hardwood floor sanding and staining tips and tricks from a professional.
Tip #1 Blurred Lines by Robin Thicke is an excellent song to stain to.
I guess that’s a matter of personal preference, but I don’t think I’ll ever be able to walk in the guest bedroom again without singing “Everybody get up”. And I stained that floor long before all of this Miley twerking business and I refuse to let her ruin it for me. 🙂
The Billboard Top 100 list was my closest companion during this hardwood floor restoration process so I’m going to give you the billboard chart of hardwood floor sanding and staining tips and tricks!
The general process will be the same for everyone:
- clear out room
- sand floors (coarse grit to fine grit)
- stain floors
- polyurethane floors at least three times
- let cure at least 48 hours
- move back in 🙂
But now that I’ve completed that process in three different rooms I want to jump right in to the tips and tricks we found most helpful and thought benefited us most throughout the process. 🙂
And, ummm, yeah, by “us” I mean “me”. Joel avoided any staining or polying like the plague. He’s a smart, smart man. 🙂
Everybody get up.
Sanding Tips
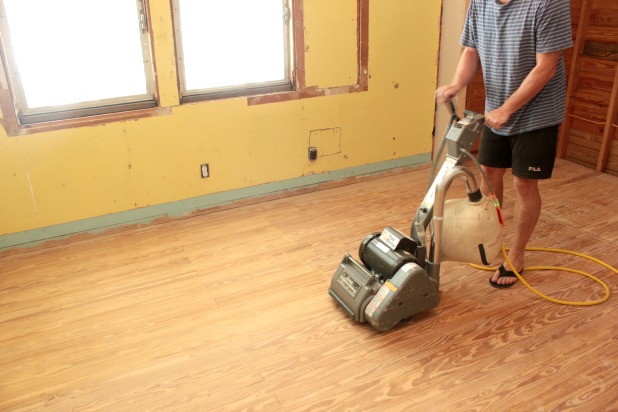
#1 – Only use the square buff if your floors are completely unfinished or you’re just trying to buff them up to paint. Much more on that here. The drum sander was not nearly as intimidating to use as we thought it would be. And Home Depot gave us some tips for saving money on a rental here.
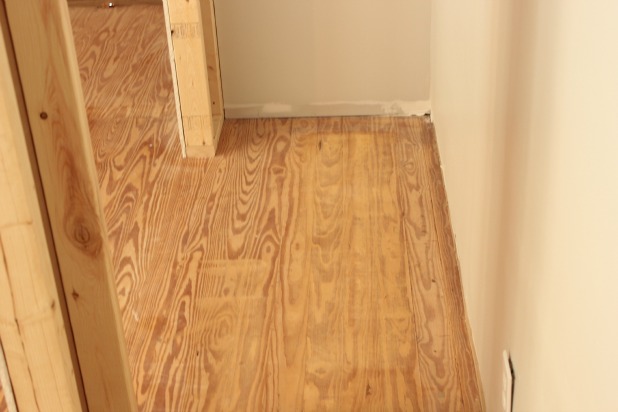
#2 – Start in the least visible spot in the room. We had just framed in our new closet in the guest bedroom so we hopped in the closet to test out the drum sander.
#3 – Start with a finer grit sand paper to get a feel for the drum sander while you’re still in the closet. Once you’ve gotten the hang of maneuvering the beast use the course 36 grit sand paper to get all of the existing finish off the floors. This tip is direct from the professional and is brilliant!
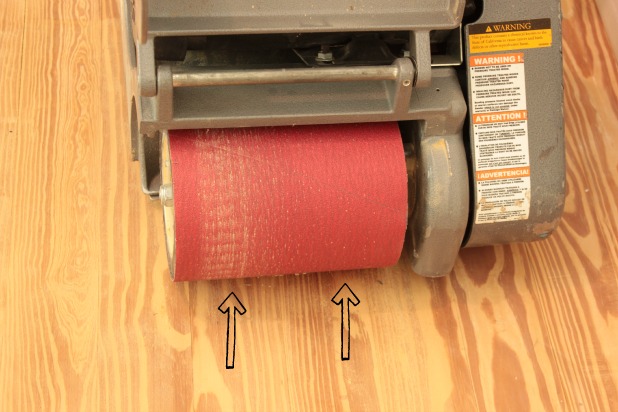
#4 – The drum sander we rented had a few quirks to it. We actually had to flip each piece of sandpaper around to make sure it sanded evenly. During your process keep an eye on your sand paper to make sure each part of your floor is getting sanded evenly.
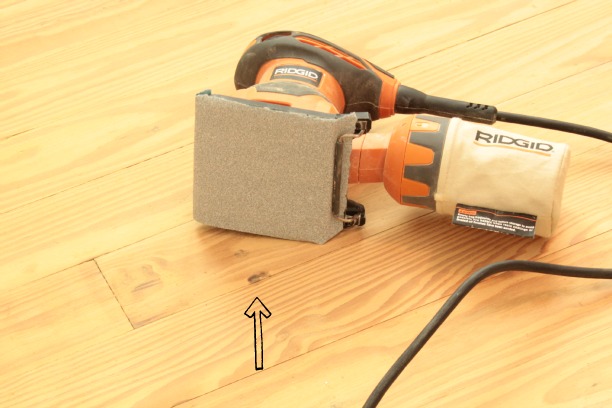
#5 – After you’ve gone over the whole floor once with the course grit sand paper use a hand sander over spots that need extra attention. Don’t create a gouge in the floor but use long stokes, going in the same direction as the grain of the wood to remove things like these random black spots we had all over the floor.
Staining Tips
#1 – If you’re sampling different colors to determine what you want don’t put your test sample sections too close to the edge of a room, which I think is instinct. It’s easier to sand up the samples with the drum sander than it is with the hand sander you need to use around the edges. (Another brilliant tip straight from the pro!)
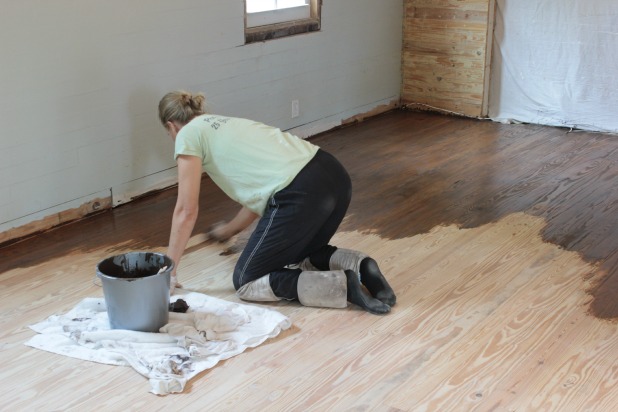
#2 – I just cut up an old white t-shirt to use for application. There are all kinds of fancy tools out there, but when I showed them to the floor professional he said we’d want to use cotton rags (old white t-shirt) to wipe up excess stain anyway. So if I’m going to end up just using the cotton rags I figured I’d just go with the rag for the whole process.
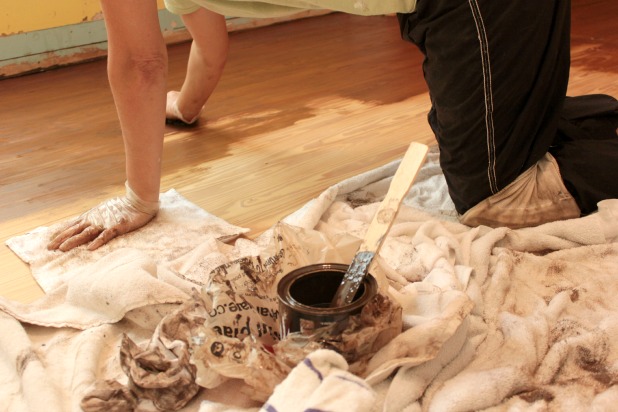
#3 – Keeping my bucket of stain (I knew I would need more than one quart so I pre-mixed quarts together for an even color throughout. Call that #2.5.) and extra rags on a towel made it easy to drag around the room. And I didn’t have to worry about stray drips on the floor.
#4 – KNEE PADS. Two pairs. One for your knees and another for your ankles/tops of feet. I don’t know about you but apparently the tops of my feet are delicate. Take precaution. 🙂
#5 – The oils from your skin will alter how the wood accepts the stain. Long pants, socks and latex gloves became my uniform so I didn’t touch the floor with any of my skin.
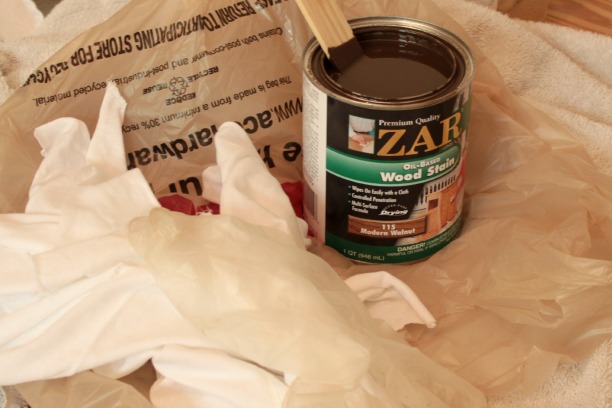
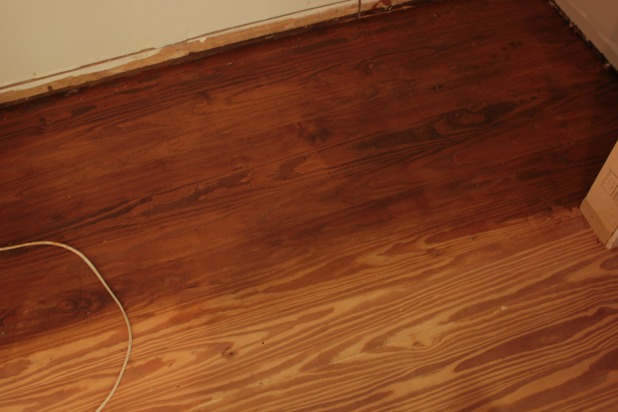
#6 – ZAR Brand. Get it. I know this other company that is really popular and they seem to dominate the market. But I’m telling you. This ZAR brand is so forgiving and easy to work with. I think it’s the only way my mom and I could stain together. She would work a 2 x 3 foot area and then I would follow her and darken it a bit and blend each section. Even after I had stained a whole row I could come back and blend in areas like this.
Unfortunately, this brand isn’t available at the big box home improvement stores. We got ours from Ace. And this is in no way a sponsored post, just a direct recommendation from the pro that worked out really great for us.
Polyurethane Tips
#1 – Let stain dry for 8 hours before applying the first coat of poly, but you don’t want to wait so long that extra dust can accumulate. The random dog hair, well that’s just inevitable. I’m considering that a hidden gift or 3 to all future home owners. 🙂
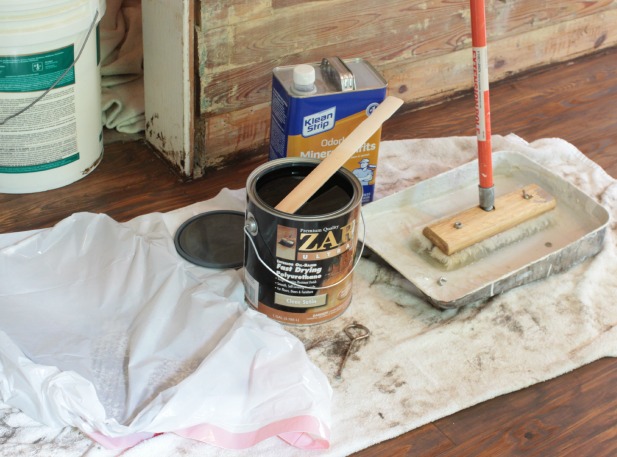
#2 – ZAR Brand. Fast drying, oil based poly. Get it. Use it. Love it. A mask or respirator is recommended, this stuff is pretty potent. 🙂
#3 – Mineral Spirits are your friend. I had never used them before, and really don’t understand what they are, but they make the poly apply like buttah. The floor professional said to soak our poly applicator in mineral spirits before we even started. And then I would saturate it a few times throughout the process.
You can also just leave the applicator in the mineral spirits between applications and you don’t have to clean it off at all. Score!
#4 – The long-handled applicator is the way to go. Once I got the hang of it the polyurethane really was the easiest part of the whole process in my opinion. #NoKneePadsRequired
#5 – Sand between your first and second coat of poly with 220 grit sand paper. That is the professional suggestions. What I actually did was do a super-quick pass with my palm sander and 150 grit paper. Basically the same thing, right?!?! Read – too lazy to go buy 220 grit paper.
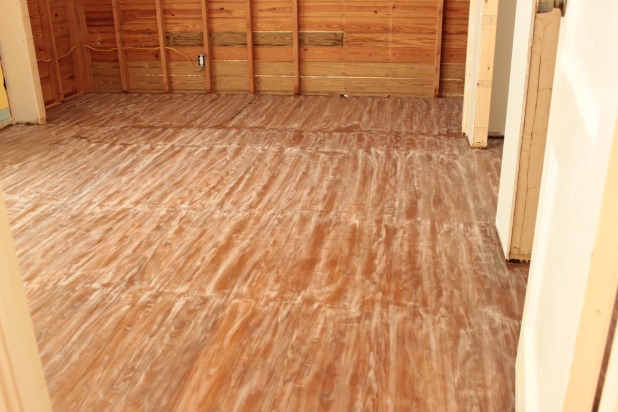
I will tell you. This step freaked me out because we went from nice-looking-floor-well-on-her-way-to-finished to this.
Even after you clean up the dust, I wiped it all down with a mineral spirit soaked rag, it will dry and look like that picture above again. Don’t sweat it. 🙂 After the second coat of poly you are back to beautiful.
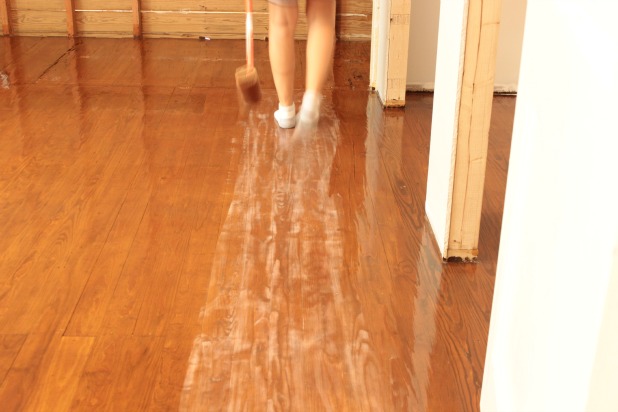
#6 – As I’m doing in the picture above, hold the polyurethane soaked applicator over the area you are about to poly so you end up applying a fresh coat directly over any potential drips. I may have learned that tip the hard way. Maybe. 🙂
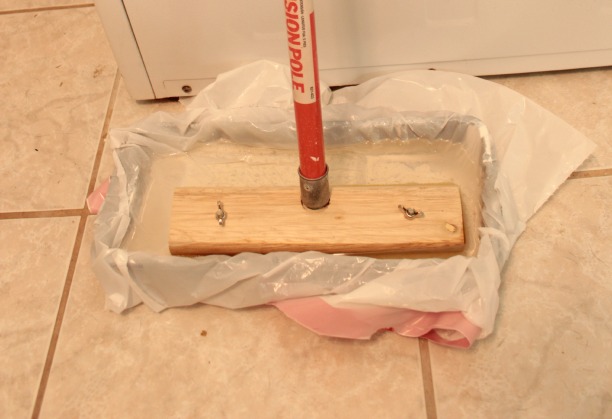
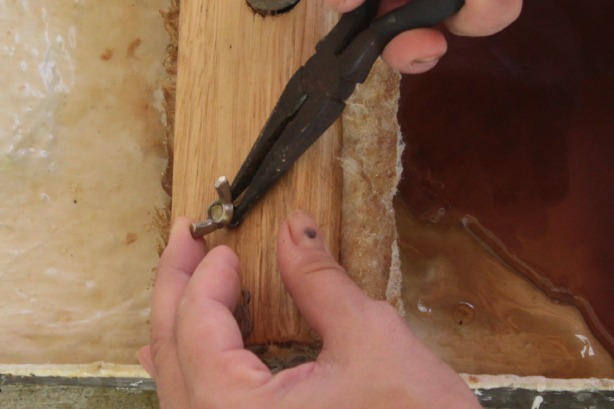
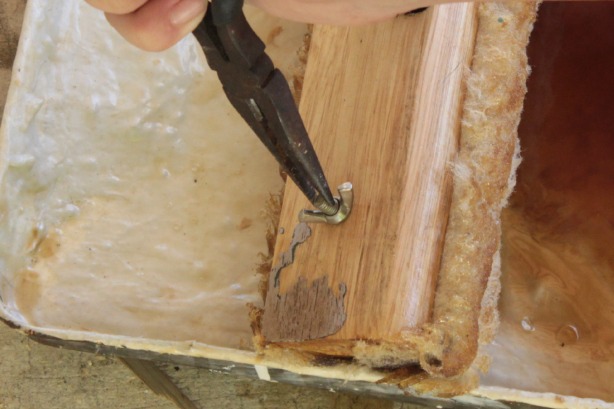
#7 – That wooden applicator holder thingy is reusable. But is a tad bit tricky to figure out. I started out in the living and dining room by just hand tightening the wing nuts that hold the polyurethane applicator pad onto it. And it flipped off midway through the room causing splatters and cursing and a brief moment of mild panic. But quickly enough, and with the help of my mom fetching tools and supplies through my frantic requests, I used a pair of needle nosed pliers to hold the screws still while I tightened the wing nuts thoroughly in time to soak the applicator in mineral spirits and smooth out my little mishap.
First hold the screw below the wingnut with the needle nosed pliers to get the wing nut started.
Then hold the screw from the top with the pliers and tighten the wing nuts completely.
Bonus tip:
If you’re using fast drying Polyurethane like I did – Be sure to do all three coats within 24 hours. The floor professional said the poly would start to cure after that and not adhere to the previous coats properly. For each of our rooms I put the first coat of poly on in the afternoon (Good lighting is really key, kind of a no-brainer but worth a mention, this isn’t really a great evening project unless you have really good built-in lighting in your room.), the second coat the following morning and the third coat that same afternoon.
Wait 48-72 hours for the floors to cure …. longer in damp climates and you’re ready for furniture!!!
Update: Amy added a great tip in the comments that she got from her floor professional. Let’s just say, we got lucky that we weren’t ready to bring in all of our things after the few day cure time. Sometimes it’s better to be lucky than good.
Unless, of course, you’re us. I’ll be finishing up the spackling of our drywall today and sanding tomorrow. Then our furniture better watch out, I’ll be gunning for them. 😉


Ally says
Your back must be strong as an ox. I couldn’t make it through staining grout on my floor without chiropractic intervention. Floors look amazing! Great milestone.
Karah says
Thank you so much!! Isn’t it amazing how sore your body gets when it really just seems like you’re kneeling over? I could hardly stand up when I was done. 🙂
Angela Robinson says
Omg. Yes I had no idea how sore I could be from this process!!
Karah says
So true, Angela, glad you can relate!
anniedm778 says
Looks gorgeous! I sanded & refinished old wood floors in my 100 + year old house, all by myself, but it was well worth all the labor. Had to use stripper to get off the old varnish finish, which was only around the outer 2 ft of each room, on my hands and knees scraping up thick dark muck. The sander would not sand on that old finish – it just skated across it. The boards were poplar, I was told, harvested from the land nearby, they were so pretty after sanding, but even more beautiful after staining & poly finishing.
Karah says
Wow! Hard work but it sounds totally worth it!!
Amy T says
Your floors look amazinh! Love watching the progress of your house.
On a sidenote, we just had our hardwood floors redone (due to a water main leak) and I have a recommendation from the pros: Do not put an area rug down for approximately 10 days after the last poly coat went down. The weight and density of the rug can suffocate the wood and deprive it of needed oxygen while curing and it can actually alter the coloring of the floor in that spot. Small rugs are fine (like the ones at doors) as long as they are not heavy, but also nothing with a rubber back. I’m glad I learned this prior to dragging my huge area rugs onto our new gorgeously stained floors. It would have been tragic.
Karah says
This is such a great tip!! I consider myself lucky now that we weren’t ready to move furniture in because the rug would have been the first thing. Thank you so much for sharing!!
Whitney @ drab to fab says
Karah! You guys are pros!! Your floors look absolutely beautiful! I can’t wait to read up on your new home, now that I’m back to blogging! 🙂
Karah says
Thanks Whitney! Welcome back!
Michael O'Donnell says
Thank you for the floor refinishing tips. I read your article to refresh my knowledge because I’m about to embark on this project. The real reason I’m leaving a comment at all is to say I enjoyed your style of writing. Your humor, wit and honesty. Thank you.
Karah says
Thank you so much for the great comment Michael! Good luck with your floor project!!
Sherry says
OK. You’ve convinced me to use the drum sander…..I think. I’ve always steered clear of the drum sander (seen too many gouged out floors) and just poured more blood, sweat, tears, and time($$$$ and sandpaper!) into the square buff. I’m going this afternoon to rent a sander to refinish 3 rooms of red oak hardwood. If I don’t chicken out I’ll try the drum!!
Karah says
I loved the tip by the professional to start with a finer grit sandpaper to get the feel for it. But we really found it much easier to manage than we had though. We were definitely intimidated. You can do it!!!!
Kathy says
It depends on the type of wood. Drum sanders are fine on oak, but with pine flooring you might want to use a less invasive sander. Takes longer – but much safer.
Hardwood Flooring Restoration says
Are you going from the outside in or vice versa?
Karah says
Definitely have to have an escape route when you start. 🙂 I worked my way from one end of the room toward the exit door.
Floor Sanders Sydney says
Hi Karah, I appreciate your efforts to put down these points and share with us. Earlier better staining will probably give the biggest tangible aesthetic improvement in flooring work.
Meire says
Hi Karah, I found your blog recently while researching information on floor sanding and staining. Your post has been the most helpful one for sure in the process of redoing our floors. I love your straight to the point tips. Thanks for sharing your experience!
Karah says
Thank you so much for taking the time to comment. You made my day!! All I can hope is that the posts are helpful so it’s always nice to hear when they are. Thank you!
George Kane says
Your floor look beautiful! Thank you for a floor refinishing tips.
parratonisha says
I just wanted to say thank you! I looked downward at my hardwood floors a few days ago and saw what I consideration was apparent tape stick up on the floor.
George Kane says
Really all floor staining are too good. Its change the overall look of home. Thanks for making a wonderful blog.
Kristi says
These are beautiful! We have a few rooms of hardwood and our dining room in particular is now pretty much unfinished due party to direct sunlight from a large bay window. I have a question for you. That floor is parquet, so how would I go about staining if I need to go with the grain? Please don’t say I need to do each square separately. 🙂
Karah says
Hi Kristi! That is a great question, I have never stained a parquet floor, and going with each square would take forEVAH!!! I would think that the squares are small enough that you could just pick a direction and go with it, but I don’t know for sure. I’ll ask around and see if I can’t get a better answer for you!!
Aaron says
Karah,
First off, great post, I wish I had found this before I began my whole process.
I found your site when researching sanding between coats of poly. Unfortunately I have exceeded the 24 hr. wait time between coats you mentioned, I’m working on more like a month. School and life got in the way, however my wife and I are about to revisit these floors. The rooms have remained empty and need a light sanding and cleaning before we reply poly.
Few questions:
1) Do you foresee any issues with reapplying the poly after such a long resting period?
2) I was planning on using 220 grit for sanding, I’m assuming you just sanded till the floor was smooth and no more?
3) Will this process remove any brush strokes (or a rogue foot print)? My father in law used a brush on the rooms, contrary to my wishes. I’m hoping that a light sand and reapply with lambs wool will smooth things out.
Thanks in advance for any advice,
Aaron
Karah says
Hi Aaron! I know for sure how projects always end up taking more time than we think they’re going to. 🙂 As for your questions, I am definitely not an expert, but I can give you my opinions, for what they’re worth. 1) The problem, as I understand it, with applying another coat of poly over poly that has already cured is that it will not mix with the previous coat it will just sit on top of it. With that said, I don’t know what the downside to that is, just that the professional we consulted indicated that the three coats in the short time frame with the light sanding in between cure all together as one thick coat. 2) I just went very quickly, not worrying about overall smoothness. 3) Not necessarily. But, given your situation, you might consider sanding off the coat of poly entirely. Then you don’t have to worry about question 1 and you can right the previous wrongs in the coat that has been applied. Have fun with your project!! And just shout if you have any follow up questions, I’m happy to help where I can.
Laura says
Your floor looks amazing!! What stain color did you use? I see a can of “modern walnut”–did you mix it with another color?
Karah says
Hi Laura, it was just the straight Modern Walnut, a little richer than regular Walnut, we loved it. 🙂
Cyndis Morris says
great job, I did mine myself the first time and they turned out great. We are having a company redo some of our floors because a plumbing company did some damage and I am not happy with how they are turning out. they just applied the second coat of stain, and I see dust and random hairs, paint brush hairs int he stain. I want them to clean that up before they poly-urehtane. any suggestions on what to use to clean up all the random dust specs, hairs etc. before its too late. I know you will be able to see all that stuff once the poly coat is on!
Karah says
Hi! What a pain about your floors! :/ I think the solution will depend on whether the dust/hairs are dried into the stain or just sitting on top. Are they sanding between coats? Maybe that step of sanding and then cleaning, maybe even with mineral spirits, will help? But, I would definitely let them know your concerns sooner than later. You should definitely get the work done properly. Sometimes it’s hard to suggest a professional isn’t doing their job right. When we had our recent kitchen install, any time I encountered something that I wasn’t happy with I would offer a simple “I noticed xyz, I don’t know your process so I’m sure you are planning to correct it but I just wanted to point it out in case you hadn’t noticed”. That seemed to work. Good luck!!
Elizabeth Robsin says
We just inherited a slew of tongue and groove unfinished hardwood flooring from my in-laws. My husband says we have to install it and then do all of the staining, sanding, varnishing, sealing, etc… after it’s been installed. But we have two dogs and will be installing it in the upstairs hallway, for starters. So we’ll have to move out of our bedrooms and bathrooms for however long it takes to do all of that. Plus, I’m concerned about possible dog fur flying around and getting into the varnish and sealant.
Is it possible that we could stain, sand and varnish all the planks, in the garage, BEFORE installing? That would avoid a significant amount of dog fur issues and allow us to use our bedrooms and bathrooms for longer. Then we’d just have to clear out long enough for installation and sealing. We’ve installed t/g laminate flooring, but have never worked with unfinished wood flooring.
Karah says
Hi Elizabeth! I think that it is possible to do all of the work first, but I can’t say that I would recommend it. We did a planked ceiling with tongue and groove and I did it all before install because the idea of doing that work overhead made me a little nauseous. haha But it is a vaulted ceiling and any imperfections are too far away to see. The one big downside to doing it first for a flooring is that the sanding ensures the floor ends up with a smooth, even feel. It is natural that the boards are not always exactly the same thickness so you could run the risk of some boards sticking up a bit. And there’s also the chance that an obvious variation in color could happen board to board if you stain them all individually beforehand. Also, if you are going to do it first, be sure to stain the tongue of the each board, with temperature changes and expansion and shrinking of the wood that wood can be seen over time. I guess, if I were to make a recommendation, doing it first for a floor would not be my recommendation, but to answer your question it is possible. Either way, have fun with your project. We had two dogs when we did the floors and there are definitely a few stray hairs in the mix. 🙂
alice says
hi i wish i say your article before i completed my floors i just finish my floors for the first time and gosh did i went through hell and sleepless night, not to mention the floor turn out horrible after completion. being that i spend so much money renting tools three time cannot afford a professional. i am going to attempt to do this again. i would like to know how long do i have to wait after poly. in order to sand the floor again and start the process. My floors had numerous streaks of different size going different direction against the grain and very dark spot in different area i used minwax jacobean stain which is a beautiful color but it didn’t look right on my floor because of the variation of colors being dark and light. I asked what went wrong but the guys at the tool rental said i might have had deep scratches in the floor. i didn’t notice any scratches prior to or after sanding so i don’t understand would you be able to help me so i don’t have to go through this hell again i am hoping the second time will end with great result. oh my back and knee still hurt didn’t have a knee pad when started job.
alice says
by the way i used a orbital sander not the drum because the home improvement
guy at the rental place suggest it he said that it was much more forgiven than the drum sanders and that it would be better for me
Lucía says
Karah should I sand the last coat too?
Karah says
Hi Lucia! No sanding after the final coat of poly, just give it a few days to cure and you’re good to go. 🙂
Lucia says
Thanks a lot Karah 🙂
Richelle Casey says
You had the best info yet on floors! I have sanded two bedrooms and my hallway, don’t laugh, with a palm sander. My husband passed away, and I drive a Camaro and am on a limited budget. The floors are sanding up nicely though. They are 51 years old. Not much poly or anything on them. And, the rooms are small which helps. I am getting ready to sand my bedroom, but last night saw a problem in my basement with my breaker box panel. So I will have to repair that before continuing. Always a roadblock! But I will get there!
Richelle
: )
Karah says
I’m so glad you found the post helpful, Richelle! So sorry to hear about your husband, you are tackling some big projects on your own. Way to go. And you are so right about the roadblocks, always!!
Dave says
Great post. I am a professional, just not a floor professional! Very true the importance of applying coats 12-24 hrs btw. I never herd of soaking the lambs wool mop with spirits!
My floors are of Brazilian cherry. Today I stained with red mahogany to match an adjacent room.
Thanks again for a great step by step
Dave
Karah says
Thanks so much for taking the time to comment, Dave. Brazilian Cherry floors sound divine! Have fun with your house projects!!
Elljean Yap says
Nice tips and tricks. Keep it up
Joeyann Brown says
Excellent article on flooring. Tackle this project yourself to save a bundle while giving your floors a fresh look.
Yuliana Johnson says
Nice tips! Stain can be applied with a bristle brush, a foam brush, or a cloth. On woods with large, open pores, such as oak, mahogany and ash, increase your pressure to work the stain into the pores. Rubbing or brushing against the direction of the grain will help fill deep pores with stain.
maggie says
I have followed your steps and am up to poly. When I sand between coats I thought to use a stick wander with 200 grit paper but how did you get dust up? Can I use a shop vac or rack cloth, not sure on the sanding between step. Also should floor “feel” dry or a little tacky. I’m not sure about walking on floor after 1w he’s and not leaving prints. I’ve watched YouTube and read articles but yours is by far the best info for a DIY, thank you.
Karah says
Thank you so much, Maggie. I’m glad you found the post helpful. It should not be tacky at all, it will feel completely dry. I used a rag soaked in mineral spirits to clean up the dust.
maggie says
How did you sand and pick up dust between application of poly. Was floor dry to touch first time you sanded. I am afraid of leaving door prints.
Also I did small test sample of poly about 4″×4″ just to see clear finish. I came back today and couldn’t see test area it all soaked in, what do you suggest?
Karah says
Hi Maggie, Yes, the poly is completely dry by the time you go through the sanding dust removal with mineral spirit soaked rag. I’m not sure what you mean by the not being able to see the test area. What sheen of poly are you using? If it is the same sheen as your stain then you won’t be able to tell it’s there really. But, the first coat does soak in to the wood a lot, that is why the 3 coats is recommended. I hope this helps. 🙂
Peter Smith says
Really Hard work but it sounds totally worth it!!
Nina Priest says
Hi Karah, thank you so much for your article, love it. Actually feeling encouraged to start many projects, aaah! Currently am about to begin the step of applying the poly, I know this is one of your older articles, but if you’re still replying, what are your thoughts of using a poly and stain all in one?
Karah says
Sorry just replying now, hope you ended up liking what you used.
Chris Winters says
I like the idea to begin sanding in the least visible spot in the room. Our current floor has started to get old and scuffed up over the years. I definitely think that we should have some professionals sand it so that we could apply a brand new stain to it.
Marcus Coons says
It really helped when you mentioned how you should start with a light sanding to get a better feel for the sander when working on your floors. I can see that taking the time to do this can help you avoid sanding your floors too much and make sure you get the proper type of sand paper for your needs. Personally, I would want to consult with a professional and have them help me refinish my floors in order to get the best results I can.
Tilesbay says
Nice tips and tricks. Keep it up.
Thanks. 🙂
Harry says
Your drum sander was out of adjustment. I recommend that the first thing you do is to put paper on the drum sander, turn it on, and just briefly touch it down on the floor in place. Look at the sanding mark. If it doesn’t cover almost the whole drum the sander is out of adjustment.
Karah says
Love that tip, thank you!
Kyle Wayne says
It’s great that you talked about how important it is to get a brand of finish or stain that will work for you and your situation. My brother is looking to get some hardwood refinishing done in his kitchen. I’ll be sure to talk to him about hiring a professional who will use quality materials.
Nelia says
Thank you so much.. all you’re info.was a great help. So much better rthan than all the conflicting information from the so called pros….
Mark Murphy says
I really like your tip to try and use a lighter grip sandpaper to get used to the sander, then from there, you can use the grittier sandpaper on the rest of your floor. My wife and I recently moved into a house that has a horrible finish on the kitchen hardwood, and my wife would like to refinish the floor but keep the wood. I will be sure to tell her that a sander would be perfect for our situation!
Karah says
Hopefully your project worked out well!!