This post may contain affiliate links which won’t change your price but will share some commission.
Who’s sick of hearing about the DIY shower pan? :/
There’s not even one lonely comment on the last post about the pvc shower liner. Yeah, I realize this is a bit much for information about one project but I really did want to create a resource where people could follow from start to finish about the project since I had trouble finding one like that online. So thanks for bearing with me. And you can use the red pin it button (you might need to click over to read the post online to see the pin it button) to pin this image and it will link back to the first post about preparation so anyone looking to tackle this can do just that. Follow along from the beginning that is … in case anyone was thinking something more along the lines of “suffer through these blog posts”. 😉
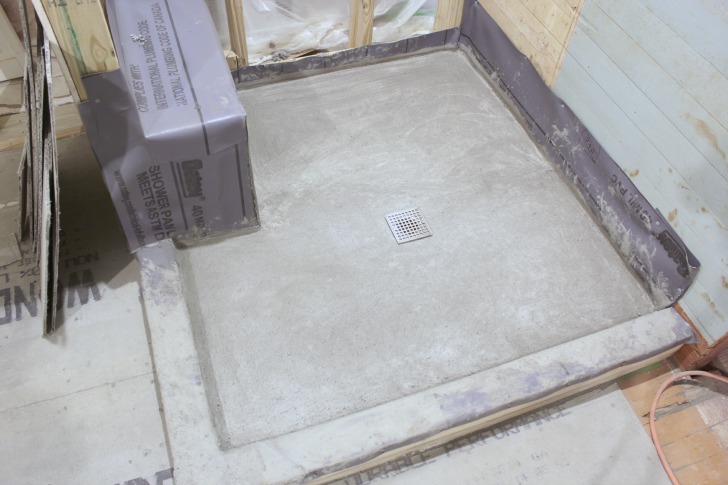
And let’s celebrate another big step completed!! I’m so excited to get to tiling and really see this room come together … we’re so close. And I’m always a little bit nervous that what I envision in my little brain will actually translate to reality.
Now, for this whole shower pan deal, I think one of the main reasons why I didn’t find any one series of tips for this project that really worked for me is because there really are so many different techniques and processes that you can follow. The minute I found a useful tip and then researched it more became the minute someone else was saying not to do it that way. I read forums where people who were claiming to be professionals debated every aspect of creating a diy shower pan. So I decided to do it how it made most sense to me and seemed to be the most practical use of time and resources.
If you’re starting with your wall studs you can get started with this project by checking out our preparation and planning steps, and then creating a preslope and then laying the pvc shower liner. Now we’re tackling the final step which is the mortar bed over the liner.
Oh, and one more thing … I did every aspect of this project solo. As in, while I was home alone so I didn’t even have the option to get help if I needed it in a crisis. One brain of average capacity, two girl hands and three plus hours of an upbeat playlist to keep me going.
Now for the how-to:
Step 1 – Gather you supplies (affiliate links to products we use)
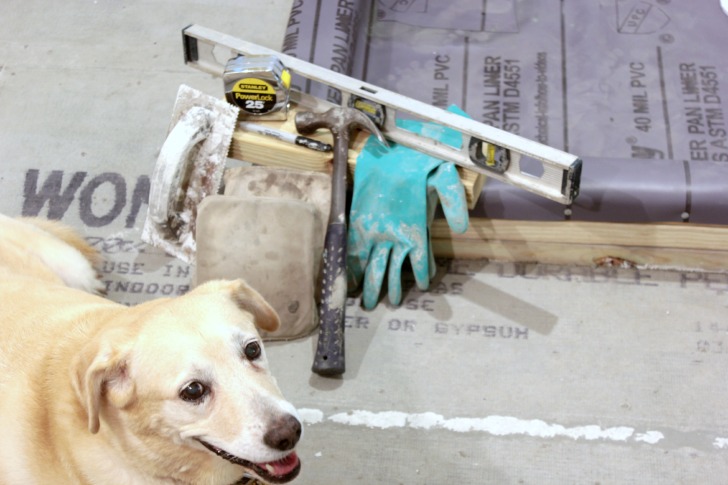
- 2 foot level
- tape measure
- hammer
- marker
- two pieces of 2 x 4, one about 12″ long and one about 18″ long (you could use a trowel also)
- knee pads, we bought a cheap volleyball pair at Walmart a number of years ago and they still work great
- rubber gloves
- an empty bucket
- puppy, optional
Step 2 – Install the screen piece of your three-part adjustable drain and measure the distance from the edge of the drain screen to the wall of your shower that is farthest away. This is because you are going to want to try to create a level line where you shower pan meets your wall and the longest distance from your drain to your wall will need to have the most amount of slope.
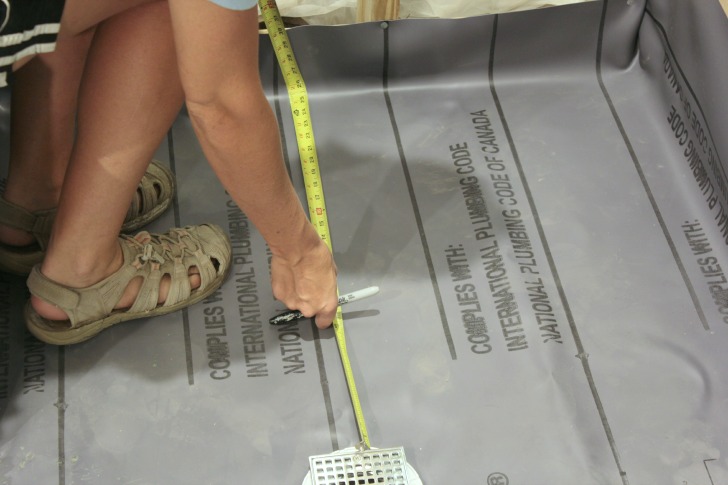
Also measure how high the top of your drain sits up from the shower liner you have installed.
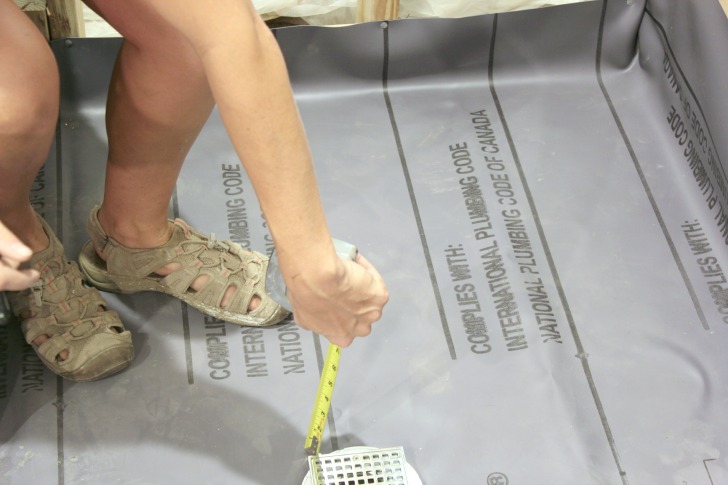
Now, I am super sorry, but there is some math involved here. The height of your drain is your starting point and the distance to that far wall determines how much of a slope you need, standard is 1/4″ for every foot. My drain was about 1/2″ high and my distance was about 2 feet. So I needed to bring my slope to meet the wall about an inch higher than the liner and then angle it down so the depth of my slope came to meet the shower drain.
Step 3 – Determine your slope based on step two and use a marker and your level to indicate a level line around each wall of your shower.
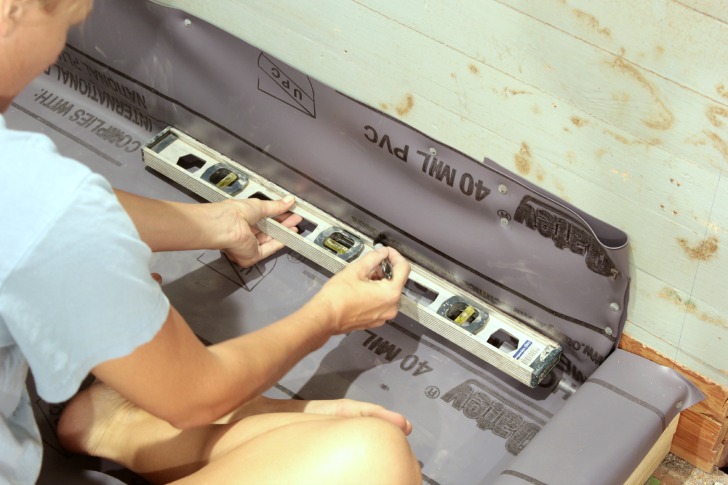
What you want is your line to be level but your slope toward the drain isn’t necessarily going to be the same on each side.
For the sides that aren’t as far away from the drain the slope is going to be a little more severe. But better too much slope than not enough. And the reason you want to aim for a level line is to make tiling easier, if all goes well, we should be able to start our tiling on the wall with our first row of full tiles right on top of the floor tiles. If we tried to get an even slope and not worry about level we would need to make angled cuts on that first row of tile so they could sit flush to the floor tile.
I vote for more mortar work up front and less tile cutting in the end. Let’s just hope it works out that way. 🙂
Note of opinion: Ok, so here is where many professionals differed in opinion.
What comes first the cement board on the walls or the final layer of mortar in the shower pan?
I opted for shower pan first and cement board second. It was a pretty easy decision because one thing that pretty much every professional agrees on is to tile the shower floor first and then the walls so the water runs down the walls and onto the floor tile and not down the side of the floor tile with potential to creep behind the tile. With that same theory in mind I opted to complete the shower pan mortar bed first and then hang the cement board so any water that found its way behind my tile and onto my cement board would then trickle down to the top layer of mortar. If the cement board was installed first then the water would find its way down the liner, which is below the mortar. All of this is really in preparation for the worst case scenario, a leaky shower, so let’s hope we don’t ever have to test these theories in real life. 🙂
Step 4 – Mix your mortar, 1 part Cement to about 5 parts Sand Mix. We’re using the exact same products we used here except in a different ratio. The idea behind this is that this mortar bed will be somewhat porous so if water does creep under your tile it can seep down to your liner and then will head toward your drain thanks to your preslope. Again, we’re planning for, and hopefully working to prevent, worst case scenario.
Step 5 – Remove your drain screen and make sure you don’t cover up your weep holes while you create your mortar bed.
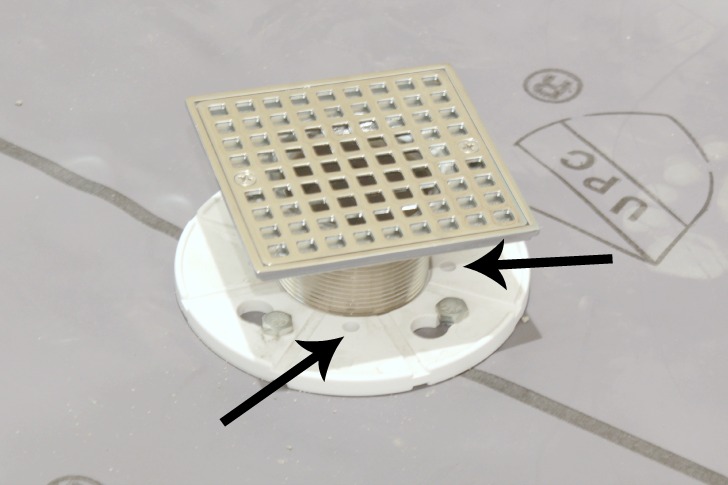
The arrows are pointing to two of the four weep holes that need to be left open in your drain. Again with worst case scenario, but if any water finds its way to this point those little weep holes will give it a place to drain. I found that the innards of a pen worked great to clear our any mortar that had found its way into those weep holes during the process. I used the exact same process to install this mortar bed as I did to make the preslope.
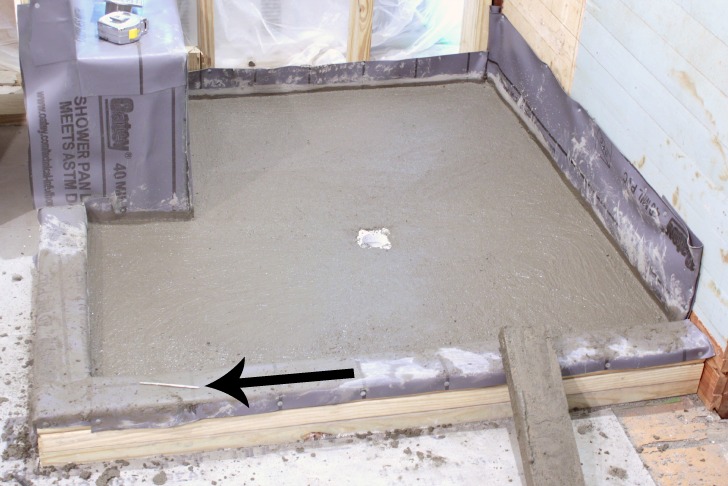
You can see from the picture that the mortar does kind of muddy up the liner, covering up your level line, so I kept my level close during the whole process and double checked level along the perimeter of the shower pan where I couldn’t see my mark.
I also ran into a little bit of too wet mortar in the end (I hadn’t mixed it well enough) and I was worried that it was so soupy that it would shift before drying … so I did something that would probably make a professional cry … and I just sprinkled on more dry Sand Mix and it absorbed right into the wet mixture.
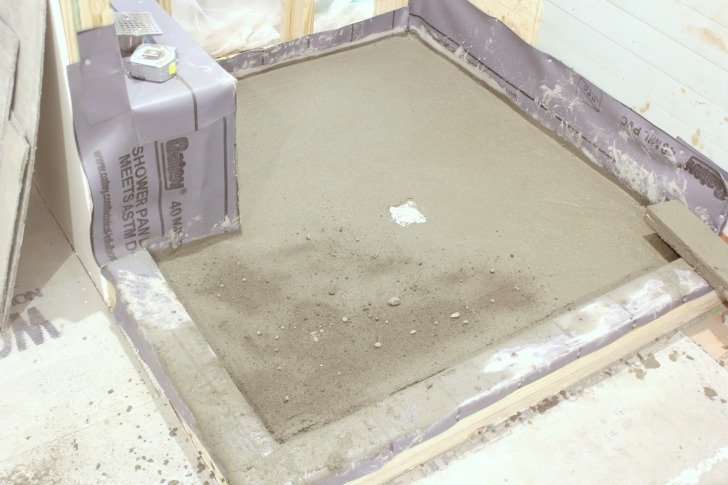
We’re also getting into the evening with zero natural light so the photo lighting gets a bit wonky. 🙂
Here it is all dry the next day.

And I just took the flat edge of a trowel and scraped it over the top to remove any loose particles or bits that stuck out, just like I did with the preslope.
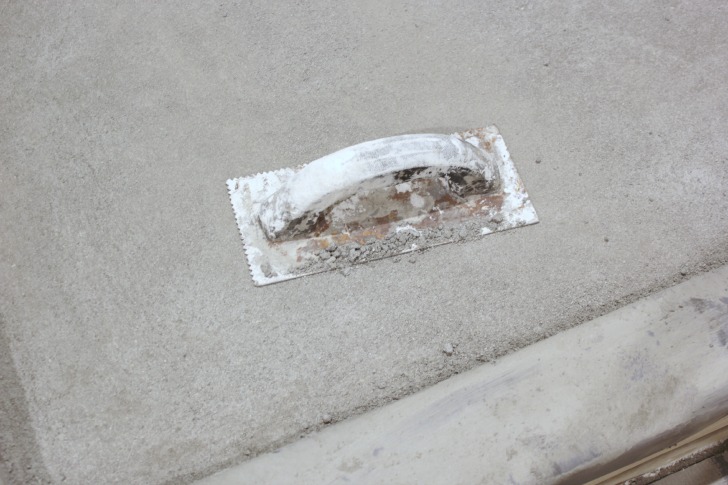
And we’re finally done with that project!!
Update: Now that your shower pan is complete check out these master bathroom renovation posts that might come in handy.
- how to prepare your shower for tile
- should you use natural stone tile in a bathroom
- how to lay an irregular shaped tile
A few sheets of cement board, a little extra waterproofing and some detail work and we are going to be ready to tile!
Which is a far cry from where this room started. This is what used to sit in the exact spot where the shower is now.
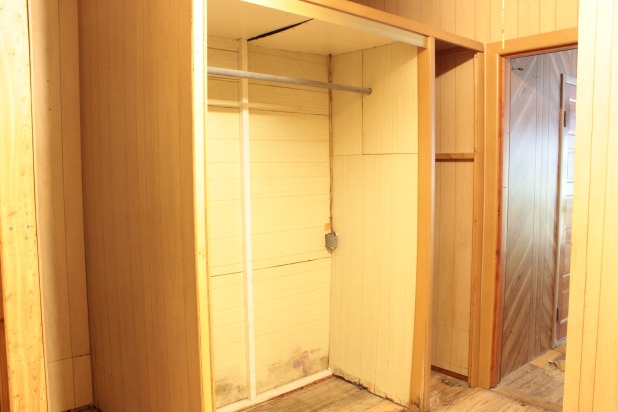
Paneling … Nevermore. 🙂


cassie says
so i am not really into the shower pan but i didn’t want you do have no comments. 🙂 don’t be lonely.
Karah says
Thanks buddy, if only every project could be purty!
Robert Newcomb says
i think you are very brave. You made good decisions and kept at the work even when is might not be so much fun.
Did the shower and tile all work out ok?
Karah says
Yes, there is more detail on that here, https://thespacebetweenblog.net/tiling-bathroom-marble-tile/
Carmen says
Although I read your blog I rarely reply but wanted to this time, so you wouldn’t think we’re bored with your renovation. I think that you’re both doing a great job but hope I never have to do the same. LOL
Karah says
Hahaha, thanks Carmen! I’m glad you’re enjoying following along … and sometimes I definitely think, man I hope I don’t have to do that again anytime soon. 🙂
Claire says
i have been looking every day for more shower pan! that PVC liner step, man! all i had to say was something along the lines of, “good job, you poor thing” and i wasn’t sure how supportive that sounded. Looking forward to seeing the finished tiled project, and the how-to on the shower tiling.
Karah says
Thank you so much, Claire! I like a little commiserating every now and again. 🙂
Sean Rafferty says
you did an awesome job…. looks great from its start as a hole in the floor with a body under the house to a ready for next step pan. just remember in this industry…. everybody has their own way to do stuff, and yours is never theirs….. now get back to work… 🙂
Karah says
Thank you, Sean! And you’re so right, now onto the next step!
Ally says
Let me just say, that if I ever do a shower pan (I’m still in denial about starting our master bathroom), I’m calling you to come over. I’ll feed you and everything. 🙂
Karah says
Sounds like fun to me!
Linda Chin says
Okay, I’ll just say it…..you are amazing!
Karah says
Aww shucks. You might want to hold judgement until after I attempt some tile. 🙂
bruni figueroa says
Hi Karah, a huge thanks for all your time and effort in researching, executing and sharing all your steps in this process. I’m looking for a fixer upper and have been pin-ing your posts as I plan to pull them up when the time comes for me to tackle this project. The fact that you’re doing this by yourself gives me the courage and encouragement to tackle this when it’s my turn. Please know that I feel grateful and blessed to have this information. I look forward to seeing your results as you reach the finish line on this project.
Karah says
Thank you so much, Bruni!! Have fun with your own fixer-upper, the hunt for the right one is part of the fun! There are so many things I’ve tackled that I thought for sure were going to be harder than they were … but the sense of accomplishment after completing something new is indescribable. 🙂
Christy says
My husband and I are looking at replacing our shower someday hopefully soon, so I’ve been very interested in the whole shower pan adventure. Thanks for all the details!
Karah says
That’s great, Christy. This is a great DIY project, it just takes time and patience … and hopefully some of the things I’ve learned along the way can make it a little easier for you!
KathleenC says
I’m so glad I found your blog from Better After! I can’t wait to read through to the beginning! I’ve visited Key West many times (my parents snowbird there on the navy bases), and have such good memories of your island home. And I’m in the midst of a (much, much smaller) renovation/remodel on a new bought older home right now myself. I hope very much I never have to do a shower pan… but you never know. And I’ll know where to look for good information now!
Karah says
Hi Kathleen!! I think it is so neat that the military can come and stay on the navy bases, such a great way to affordably visit the island. And thanks for the kind words about the blog, I’m so glad you found it too. Have fun with your own project!!
Jen Swanger says
Hi Karah, This whole shower pan process of yours could not have been more timely! We started our master bath reno in July and we decided to create more of an open shower. Our reno is coming along much more slowly since my husband has been working out of state a lot. But, since neither of us have tiled more than a floor before, I did a lot of research on what is needed for a competent shower floor, having no idea how much was really involved. I found the same frustrations that you did (lots of advice that often contradicted itself). I’ve been subscribing to you for awhile and was so happy when the first email came through about a shower pan. **Finally!!** And since I’d probably done all the same research you had, I was so glad you had mentioned many of the things encouraged out there and explained (logically) why you did, or did not, follow it. I’ve been anxiously awaiting every subsequent email as you continue the process, which I have my husband read also, and to which he now consults when he has any questions. We are so thankful that you took the time to figure this out and post it for the rest of us. Even if it’s not THE way (sounds like no one really knows what that is anyway) it’s still very amazing. Your tile is beautiful and I can’t wait to see your finished bathroom. If I ever think about it, maybe I’ll send you some of our pictures… Then you can feel much more accomplished.
Karah says
Hi Jen! I’m so glad the series is helping you. It is kind of mind boggling to read all of the different opinions on the “right” way to do things. And as for your reno taking longer, doesn’t it always take longer than you think?!?! It always does around here. I’d love to see pics, you can always post them on the blog’s Facebook page or email them!!
lynn says
First of all, I am in AWE of you doing this huge job!!! I just found out my beautiful shower that is leaking profusely into the basement, all because it had no pan liner, has to be torn out. Plumber told me the floor needs replaced and pan liner put down. But the really disheartening part is he told me the cost would be 4800.00! I was so shocked over all of it, told him way out of my price range. He said 500 of it to demo shower and 4300 to put new one in.
I am very happy to read your blog and step by step instructions. I will have to have help, but this gives me much needed info—- I can’t thank you enough!! You are AWESOME!
Karah says
Yay!! I’m so glad you found the series Lynn. Give me a shout if you have any questions. If you have another shower to use during the process just take it one step at a time, then it might not seem so daunting. And have fun, play good music, it makes any job more fun. 🙂
Christine says
This has all been so helpful, just one question for this step….When you changed the ratio for this step did you still want the same “wet sand” look before laying it out or was it a wetter consistency?
Karah says
Hi Christine! I’m glad you’re finding the series helpful. The difference in ratio for this last step is the ratio of the Sand Mix to the Mortar mix, the look will still end up having a wet sand look like before, but using more sand mix and less mortar in this step will make the shower pan more porous so any water that does get under any tile and grout won’t get trapped there, it will seep down to your shower pan and then be directed toward your drain by your pre slope. I hope that makes sense, please don’t hesitate to reach out with any other questions and have fun with your project!!
Kristie says
Hi Karah!
I pinned your shower pan install over a year ago and have been more than a little nervous to tackle this one. And I think I may have screwed up! I am on Galveston island and don’t have the same brand products available to me that you used. The prestige came out perfect and the liner went in relatively easy. However… I’m afraid the shower pan itself is NOT working out. I did the 5:1 ratio and mixed to a wet sand consistency. I finished yesterday around 3pm and by 9 pm tonight, it is not “set”. I can push on it and make an indentation. I can dig a little and it comes right up like sand. I’m not sure if its the issue of different brands or if I’ve screwed up. Thinking I may have to start over tomorrow. Any ideas or suggestions?
Karah says
Hi Kristie!! I feel your pain!!! Did you happen to read the post about the preslope? I had the same problem, my mixture just kept crumbling apart. https://thespacebetweenblog.net/how-to-diy-a-shower-pan-preslope/ My problem had to due with using the wrong stuff, so you may just want to double check on that because I know it can be really confusing especially since you’re dealing with a different brand name that might even name the products differently. You really need some sort of a mortar mixture in there (even though it’s not necessarily called that) because that is what is going to harden and give it the structure. You need the sand mix part of it so that it is partially porous so in the event water does penetrate your sealer and seep through your grout it will make it down to your liner and then into your drain. But getting that combo just right is tricky and took me 3 tries. I wish I had more concrete (no pun intended!) advice for you but don’t give up! I know it’s frustrating but you will have such a sense of pride in the end. And please don’t hesitate to reach out with any additional questions, I’m happy to help where I can.
Kayce Steadman says
I am currently building a walk-in shower in my master bath. Your tutorial has been very helpful to me! Thanks for taking the time to make it.
Karah says
Thank you so much for taking the time to let me know, Kayce!! Have fun with your project. 🙂
Hannah says
Thank you for sharing all these details and step by step instructions! My husband and I have been debating making our own tiled in shower and now I feel much more confident about it.
Karah says
Thank you for the comment, Hannah!! I hope you guys enjoy the process. Take your time, expect a road block here and there and keep you eye on the prize. I’m sure your new shower will end up beautifully!!
Anthony Larcom says
Nice blog post. I made the mistake of not measuring the angle of the pitch and poured the walls to high. I bought a angle grinder and cut the drain out. After o raise the drain would I best served to pour mortar around the drain, let dry and then use SLC to true up the angles so that the slope is not so steep or just use SLC to pour the drain fill and throw slope as well?
Karah says
I think you should inquire with a professional, this sounds beyond my expertise. 🙂
Ken says
My shower pan (pvc) was leaking so I’m having it replaced with a 40 mill pvc liner.
My question is do you run the liner on the inside or outside of the vertical board that the tile adheres to?
Karah says
I have a whole post about how I did the liner here, http://thespacebetweenblog.net/installing-a-pvc-shower-liner/
Ashley Young says
How much space did you leave on top of the height of the drain and the mortar itself? I’m assuming you need to line up the floor of the tile with the drain top. So many calculations! Your work looks amazing, this has been the most helpful source so far!
Karah says
I’m so sorry for the delayed response. I assume you’re done with your project now and hope it turned out great!
obo says
Did you use concrete or cement/sand pack?
Karah says
I show the exact products we used here, http://thespacebetweenblog.net/how-to-diy-a-shower-pan-preslope/
Jason R Autry says
Great series! I may have missed it, but did you show how you laid the cement board? Does it sit on the top of the final mortar bed? Is there supposed to be a gap?
Thank you!
Karah says
The cement board step is in this post, http://thespacebetweenblog.net/how-to-diy-a-shower-pan-preparation/.
Erni Rawson says
So cool! I just found your Blog as I was searching how to build my shower now in 2018. So the info is great and similar to others I read. I DIY practically everything with my wife. She helped roof, etc. So -so cool! Thanks for the insight! Good luck to you all in your endeavors!
Karah says
I hope your project worked out well, glad you found the series helpful!
Tom says
Very well done and informative set of posts!
If I read it correctly, you sloped the cement on the layer underneath the liner and the layer on top of the liner. Did I read that right?
Jardie says
How did you cover the membrane on the bench?
Karah says
The next steps are here, http://thespacebetweenblog.net/master-bathroom-renovation-progress/