This post may contain affiliate links which won’t change your price but will share some commission.
Oh yeah! We’ve actually “finished” a wall around here. 🙂 And it’s a feature wall with board & batten even. And the feeling is … well, awesome!
Week one of our home renovation project saw a lot of demolition. And things changed pretty quickly and it was easy to get giddy excited about seeing it all come together. Buh bye paneling, helloooo beautiful Dade County Pine walls and ceiling. (Did you see the “before” version of the house tour video?)
But then after days of removing the drop ceiling, spackling the cracked paint and then sanding and prepping it all … all on the ceiling, above my head with only daytime television to keep me company (Can we all agree that Ellen is the best?) it was beginning to feel like I wasn’t making any progress other than giving myself a pretty significant crick in the neck … and uncovering walls that just needed more work.
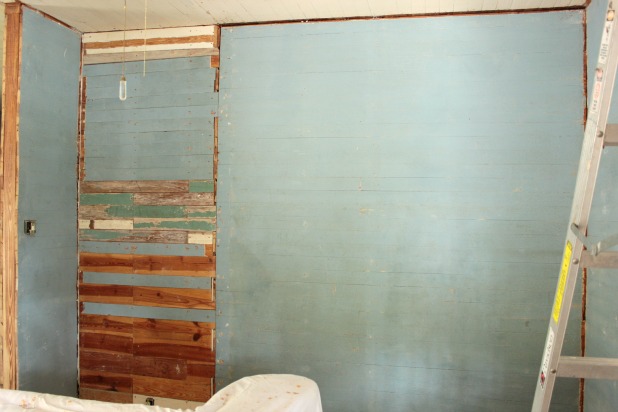 Part of that wall used to be a hallway. We didn’t see that coming. 🙂
So we decided a high board and batten treatment, with a little something extra to cover the existing imperfections would do the trick.
The original plan was to buy sheets of MDF and have them cut at Home Depot. But, we learned that they now have a policy that they won’t cut anything less than 12 inches. And since I didn’t want my battens 12 inches wide, I convinced Joel that the only solution in the whole wide world was that I needed a table saw.
In the long run buying the table saw will actually be more economical than going with a more expensive pre-cut wood for this project. There are ideas down this home renovation road that include built-ins and cabinets and closets … those projects will all use the table saw so I’m pretty stoked to add this little tool to our repertoire. (Nope, definitely didn’t spell that right the first or second try.)
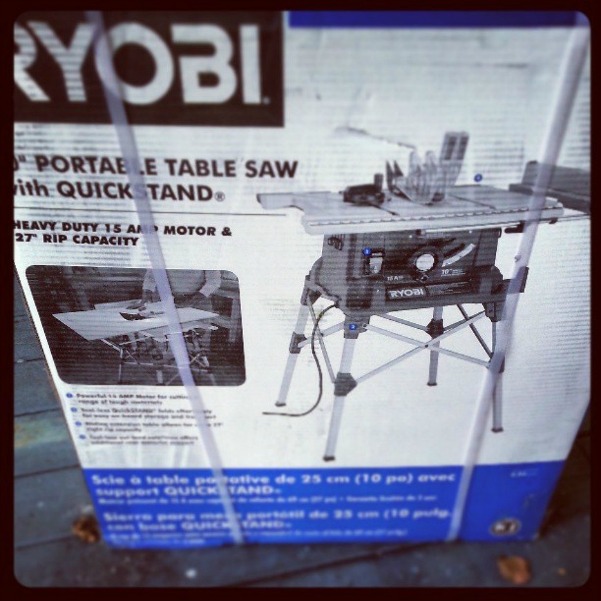
So, while Joel primed and painted the ceiling in the living room I got to know my new saw. And then he and I worked together to cut the 4 x 8 foot sheets of MDF down to size. Since I already had the cut measurements planned out, other than learning the different knobs and gauges on the new saw, this step is pretty straight forward.
I knew we wanted a high board & batten because of what we had uncovered on this particular wall.
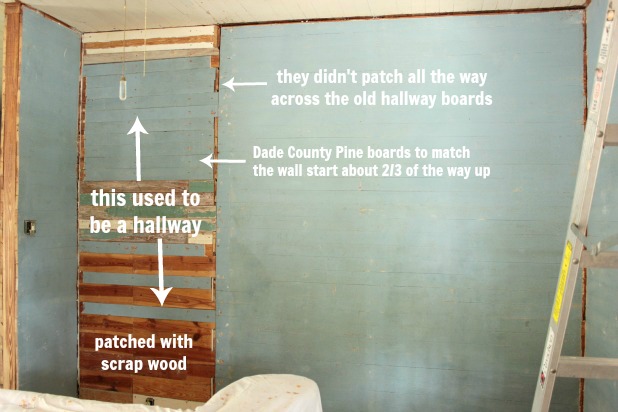
When we removed the paneling, and then the drywall, we discovered that this wall actually used to be a hallway. Womp, womp. We had been thinking a beautifully stripped, wood slat wall behind the sofa. But what is a home renovation without a little improvisation every once in a while. 🙂
There were two main issues we needed to cover up. 1) the wood they used on the bottom two-thirds of the old hallway entrance was not the same width as the Dade County Pine boards we have on the rest of the wall, and 2) the vertical line that used to be the edge of the old hallway entrance was visible all the way up to the ceiling.
(We used our favorite primer to get this great base coverage over that bright blue.)

But, we also want to keep as much of the Dade County Pine exposed as possible, so I wasn’t in love with the idea of just drywalling the whole wall. Luckily, there is this thing called the internet and this site called Pinterest where I pinned a great article from The Nester about her board & batten that goes two-thirds of the way up her wall. And then the Spring Pinterest Challenge was announced and I was on it!
The challenge is not sponsored by Pinterest at all, it was thought up by Katie from Bower Power and is co-hosted by Sherry from Young House Love and this time around by Emily from Sparkle Meets Pop and Renee from Red Bird Blue.
 My very first blog post was actually a Pinterest Challenge project so I have a hard time not participating in these fun little events.
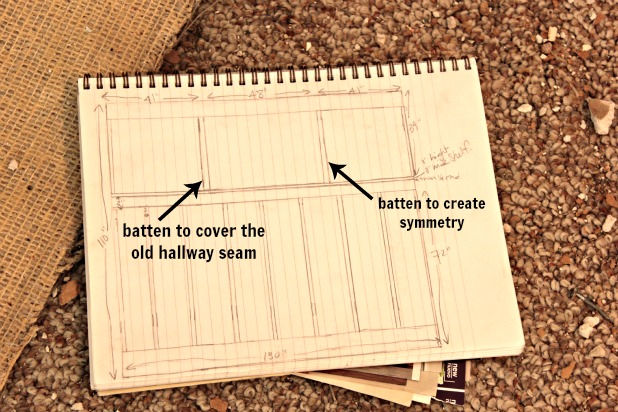
So, with The Nester’s wall in mind I actually sketched up a little (not-to-scale) plan that would cover the scrap wood on the lower part of the wall and the old seam between the old wall and hallway.
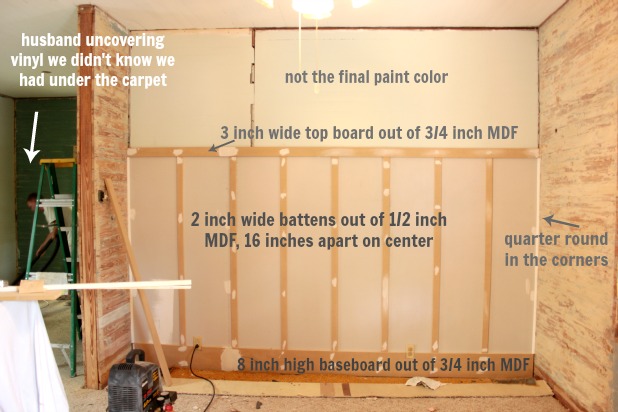
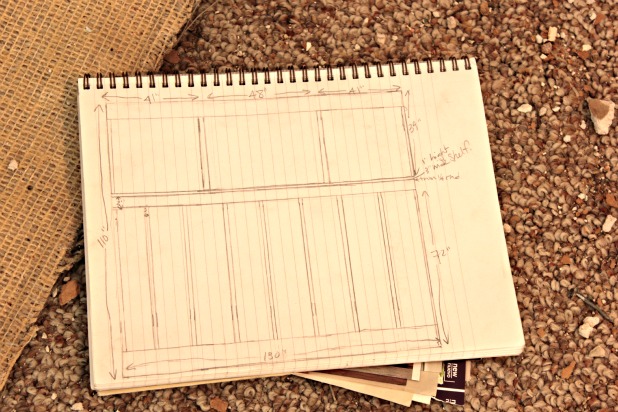 The idea was to do a basic board and batten that would extend two-thirds of the way up the wall with a shelf at the top. And then, use another batten above the shelf up to the crown molding (we also needed to install) to cover up the section of the wall that used be the side of the hallway. Then, measure how far that batten is from the side of the wall and extend another batten the same distance from the wall on the other side to even it out. Make sense?
 Since we were starting with a random-width-wood-slat-wall (say that 5 times fast) we needed to first add a drywall base to the bottom two-thirds of the wall. With a little forethought (and luck) I was able to put the drywall seams and screws at the same distance I wanted my battens (16 inches on center), so I didn’t need to do any spackling. Booyah!!
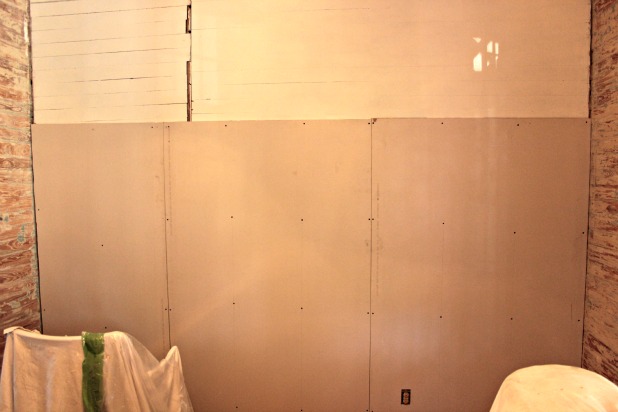 Do you know they have 1/4 inch drywall now? We considered it because we really only needed the smooth surface, but we were worried it would break on the ride home since we didn’t have a truck bed big enough to lay it flat in … and it was $1 more expensive than the 1/2 inch sheet we ended up going with.
And, see how the slats that were added to cover the old hallway aren’t level? That would mess with me the entire project. They drove me a little batty, and made me question all of our measurements, and the level. In the end, we just accepted that this is an old, not level, a little wonky, but totally cool old house. We think these little imperfections just add character and history.
I actually painted the wall above the drywall at this stage, twice. And ended up painting it a third time after the board and batten was all installed. Long story. 😉
If you have decided on your paint color, painting above the board and batten now will actually save you time.
It took the better part of an afternoon to get to this stage. Then progress came to a screeching halt when I realized I had bought the wrong length board for the shelf. Boooo.
I thought one piece of pine board would look best for the shelf in case I wasn’t able to effectively cover the seam when butting together a couple of pieces of cut MDF. And Joel likes the idea of the added strength of one whole piece. He seems to think I’m going to actually put things on the shelf that are probably too heavy for it. I have no idea why he would think that. 😉
But I’m going to have to give you the step-by-step of how exactly we put our wall together next time. And the numbers geek in me is going to totally have fun tracking our spending as we tackle all of the projects around here. Although the budget for this project is going to be a bit wonky since we bought a 5 gallon jug of trim paint. But it’ll be nice to have that accounted for as we become trim cutting, sanding, priming and painting fanatics.
And one more look at our one and only finished wall. AKA – our favorite wall so far. 🙂
Update: Follow ‘the rest of the story’ (who’s thinking Paul Harvey?), the full board & batten tutorial here.
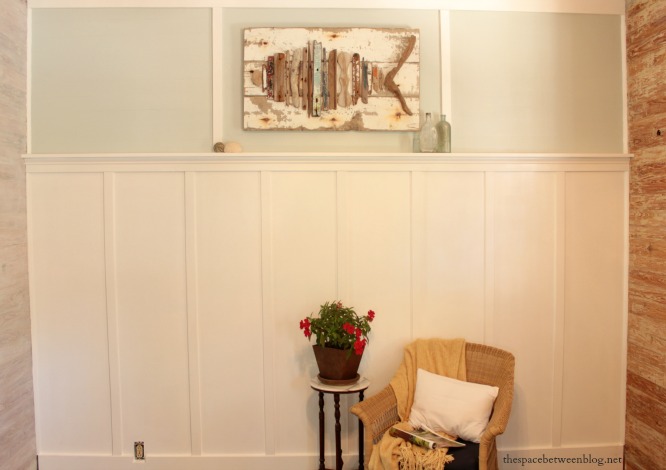
What do you say, do you remember the first wall you completed in your house? Was it an accent wall, or a fun color, or were you just happy to get some paint up? What about the Pinterest Challenge, are you in?


Kara says
Looks amazing! We’re in the midst of a bathroom remodel and are using board & batten on the walls, I hope it looks as good as yours 🙂
karen@somewhatquirky says
Holy Crap! I love the wall but I am flat google-eyed over that fish!!!!!!! You can be sure when I have a lake house or a home in Key West I will make me a fish like yours!!!!!!!!!! Or maybe I should just make one anyway….
Linda @ it all started with paint says
Love, love, love it!!! And that drift wood fish art is amazing — did you create that too?
🙂 Linda
Anne@DesignDreams (@ddreamsbyanne) says
Freaking gorgeous Karah! and I adore that fish artwork too!!!!!! Great job, and boy do I know what you mean about what lurks behind those wall and floor coverings. When I had to drill for my bathroom plumbing I went through 4″ of various flooring and subfloors…. ay yi yi!!
Julie W says
I adore B&B treatments, and yours ROCKS. My landlord and I are currrently discussing whether or not to add B&B to the living room of our home. I think it would be awesome. The 4 windows in there already have a nice ledge (with flat, unfinished edges thanks half-assed builder) so they would be easy to incorporate. Alas, the men in our lives persist in the belief that we are incompetent builders. Waiting for them to each be gone for a while so we can prove them wrong!
Karah says
Hahaha, you show them!! You can do it. And the result is so worth it!!
Laura says
Love the fish! We are fishermen here, so would love to know how it is made, or where you got it!
Toodles,
Karah says
I made it, and it was so easy … start collecting driftwood and check back next Thursday for the tutorial!! Thank you so much for stopping by!
Krista @thehappyhousie says
This looks absolutely gorgeous! We just finished B&B in our entry hall and hallway and have it in our ensuite. It looks so fabulous… I love the pale blue above it too… and I wonder about the fish art on the wall. So cute, I am totally inspired to make this. Did you make it?? Glad to find your blog!
Krista
Shannon @Fox Hollow Cottage says
Drat those surprise hallways! Sure made for a gorgeous after though. I can see that being a favorite wall for a long time to come. It looks wonderful!!!!!
Krista @thehappyhousie says
Okay I just see from the comment above me that you made the fish! Can’t wait to see how… I am going to have to follow you on bloglovin’ now:) Happy day!!
Krista
Kelly @ Eclectically Vintage says
Great job!!! And that fish is calling my name!
Kelly
Karen @ Folk Haven says
Let me echo so many others in saying that that fish is sweet! I love how your wall turned out. And the table saw…. I jerry-rigged (sp?) one once using an old bookcase on wheels and a circular saw placed upside down. It was permanently on so could only be turned off by unplugging it. There was no blade gaurd. I shudder now to think of it and thank God that I still have all my parts, but it allowed me to get our floors done at a time when we were super strapped financially. I’m glad you got the real thing 🙂
Audrey Zumwalt says
Looking good … you will enjoy that saw. You guys are really tackling some hard make-overs. Looking good ! Good luck with future projects.
Blessings,
Audrey Z. @ Timeless Treasures
Gina says
Love your wall! I really want to try board and batten myself. I also LOVE your fish! I’m going to start collecting driftwood now!!
Thistle says
You go girl!!!!! LOVE IT! Totally pinning (and I love the fish art, too)!
You are SUCH a rock star with that table saw!
karianne
DesignedDecor says
Karah, you are BRILLANT! What an awesome idea and it looks wonderful!
Kelly @ Corner of Main says
Beautiful! It looks great =)
Shirley@Housepitality Designs says
I LOVE IT!!!….looks magnificent!!…and love the wall color!..You did an unbelievable job as always!! and really am loving that art work!!
Karah says
Thank you Shirley … trying to do Key West proud! 🙂
craftythriftydecoratingwifemom says
Gorgeous, dahling!! You should be proud of all you’ve (plural) accomplished in such a short time. Big projects, too. Wish I had half your talent.
Janet
Karah says
Thank you so much Janet … just continue to tap into your own creativity as you do, you are more talented than you realize! 🙂
Heidi @ Decor & More says
You are a BEAST, Karah!! This looks awesome — great solutions, fantastic results. Keep the good times rolling!
xo Heidi
Karah says
Thanks so much Heidi!! After we were finished I looked at Joel and said “my plan actually worked” … we all know that doesn’t always happen. #sighofrelief 🙂
Susan says
I am amazed at the work you do. The wall is “gorge” and your fish……a true work of art. I thoroughly enjoy your blog. Thank you for sharing.
Karah says
Thank you so, so much Susan!! And I use the word “gorge” all the time. Love it!!
cassie says
it looks so perfect! and i love it with your art above! gorgeous and beachy and so very you!
Karah says
thank you so much Cassie!
Paula says
Holy cow, this looks amazing! Can’t believe the before and after, you really did an awesome job with that wall and that fish is gorgeous.
Karah says
Thank you so much! It is one of only a few walls we’ve managed to finish on this full house project. It’s nice to focus on the finished product sometimes, as the unfinished can get overwhelming. 🙂
Jodee Weiland says
This looks great! What a transformation! Love the fish as well!