the space between

upcycle, repurpose and reinvent your space

  • about
  • aruba
  • key west
  • curacao
  • projects
  • house tours
  • privacy policy

do you feel it too?

November 10, 2014

You guys! I really can’t explain it. But I am totally pumped for the holiday season this year. I think it hits me different every year. Does that happen to you? Some years the holidays just seem to come and go as pretty regular days, and then some years, like this year, I am just so into the spirit of the season I kind of don’t know what to do with myself.

holiday-ecard

Maybe it’s because the last two years we haven’t really been able to embrace it fully in our house. Do you remember 2012? That year we found out on December 15th that we would be moving, off a Caribbean island to somewhere we still didn’t know. You can read a little about the unexpected here and walking away (in full darkness) from our experience living on Curacao here.

Buh bye quirky little island rental house.

kaya boyo

 And then last year, well, our house was barely even livable and when you’re working on creating actual, functioning living spaces its kind of hard to be all “fa la la la la”, if youknowwhatImean. Looking back, we were just bringing the first bit of furniture into the living room on December 4th, and we really only got a tree because we had friends coming to visit and we didn’t want to seem like Grinches. 🙂

christmas-2013

But this year, its real. I’m into it. I don’t even know what that means. Maybe I’ll be overdosing on peppermint chocolate covered pretzels while crafting up a storm. Or maybe I’ll just listen to holiday music marathons while finishing up the master bedroom and demo-ing the guest bath.

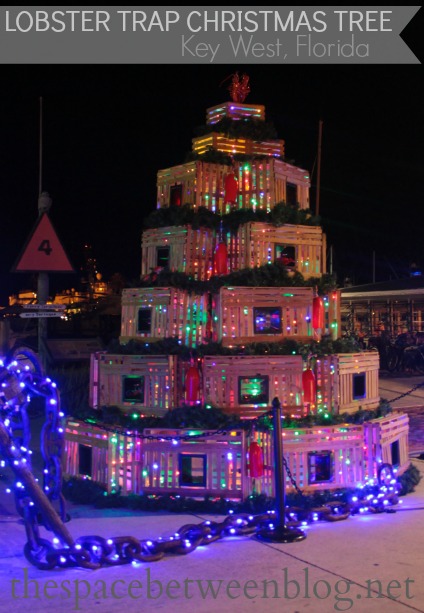
I’m pretty sure I’m going to come up with as many excuses as possible to walk into town because 1) the weather down here right now is perfection! and, 2) I need to see this lobster trap tree as much as possible.

lobster trap Christmas tree in Key West, FL

I’m already trying to do one random act of kindness per day. Just little things, but things that seriously just make me feel good. I’ve shared random acts of kindness ideas here, here and here.

random acts of kindness

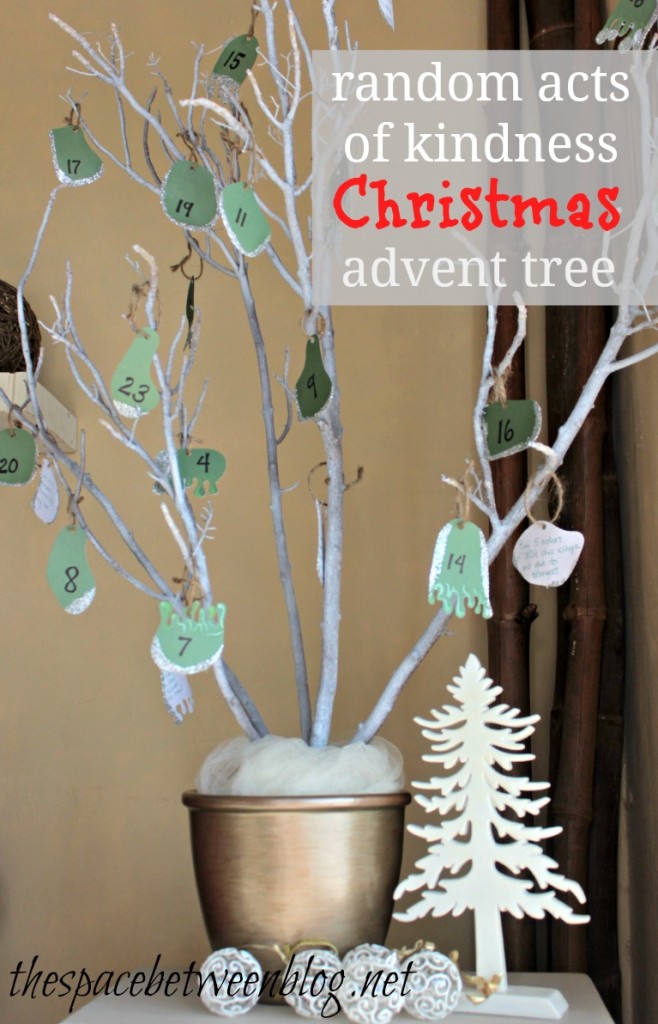
And if you’re looking for a fun advent calendar idea, this advent tree with a new random act of kindness for each day is a great way to get into the spirit.

countdown to christmas

I just had to share. I’m feeling it this year. I had to get it out. I shared 15+ crafty ways to give thanks over on Remodelaholic.com last week.

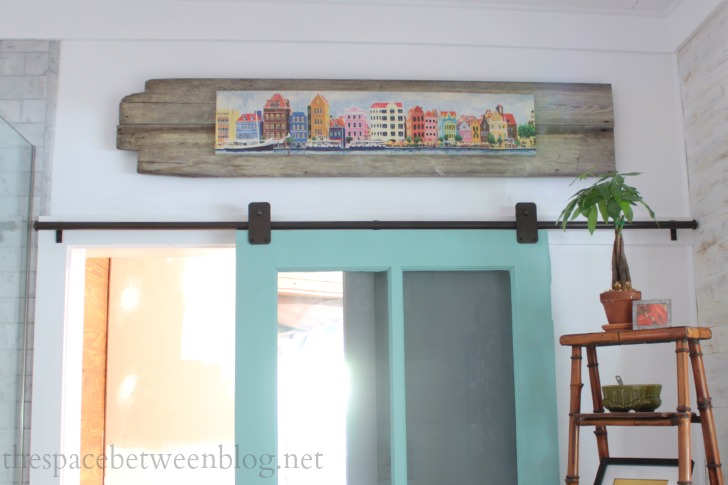
If that holiday spirit is starting to take you over, too, you might want to check out all of our holiday projects from years’ past here. The very first blog post around here was about driftwood Christmas trees and one of my favorite crafts is this little seaglass tree from a couple of years ago.

And tell me, is it just me? Or is this feeling something that’s in the air this year?

easy to install rolling door hardware

November 4, 2014

You guys! This is one of those components of the master bathroom renovation that I have been not-so-patiently awaiting. It’s like the one thing that I have been anticipating the most, probably because I knew it had to wait until pretty much the end of the project. And because I’ve had the hardware staring me down since basically the outset of this remodel.

rolling door hardware in the master bathroom

We have an abundance of doors in this little house that all swing this way and that and tend to mess up the regular flow of traffic, so the idea of installing pocket doors and other cool alternatives is something that we’ve had our eyes on from the beginning. And a cool old door with tinted window panels rolling on sleek bronze hardware is a no-brainer in my home design mind.

rolling door hardware in the master bathroom

Not only did I not want to hide this beautiful door inside the wall, but we have electric running through that wall and there are outlets and switches on both the bathroom and the closet side that we really wanted to keep. Installing rolling door hardware just made sense.

I first saw hardware from Rolling Door Designs at my friend Diane’s and after scouring their website I found just the right design and finish I was looking for to accent our bathroom. I am so thankful that they sent me this set of hardware to install in our own bathroom.

master-bathroom-door-3

I chose the Bronze Plato Hanger because I liked the simple, rectangle shape and I thought the dark color would contrast well with the aqua color of the door.

easy to install rolling door hardware

Up until the point where you actually need to hoist the door onto the track this is a great one-person DIY project for anyone. The kit includes all of your necessary supplies except the door and any desired handle and comes with easy to follow instructions.

rolling door hardware supplies

Additional tools you will need include:

  • tape measure
  • plumber’s level
  • 4 foot level
  • drill
  • hack saw (if you need to cut your rail to length)

Before you order your kit you need to know the thickness of your door so you can purchase the correct brackets. Since our door was originally an exterior door and thicker than normal interior doors we got the long brackets with our kit.

Now let’s get it all installed!

Preparation:  If you need to, paint your door before installing the hardware. Be sure you are using a solid wood door, a hollow-core door will not hold the weight once attached to the rail.

Attaching the roller straps to your door.

Here’s what the printed instructions say:

1. Install the roller straps onto the top edge of the door. The location of these straps is critical for the proper, safe use of the rolling door.
2. The distance between the top of the door and the outer diameter of the back of the wheel (measured from the back of the door) should be 13/16” – 7/8” (this will achieve approximately 3/32” gap between the top of the door and the rail when these measurements are achieved).

This is what I’ll tell you:

The most important part of this step is to be sure that the roller straps are attached to your door high enough that the actual roller wheel can fit over the rail when you are ready for that step. The diameter of the rail is 7/8″ so just be sure you have about 7/8″ from the top of your door to the outer diameter of the back of the wheel on your roller straps. I don’t even think one whole inch would be too much. If you are a tape measure ninja then you can worry about the 16th and 32nd of an inch details, but I just consider myself lucky when I’m in the right inch range. 🙂

The first thing I did was eye-ball where I thought the straps looked best on the door and decided to attach them about 1 1/2″ in from each end of the door and high enough that the diameter of the back wheel was at least 7/8″ above the top of my door.

rolling door hardware roller strap attachment
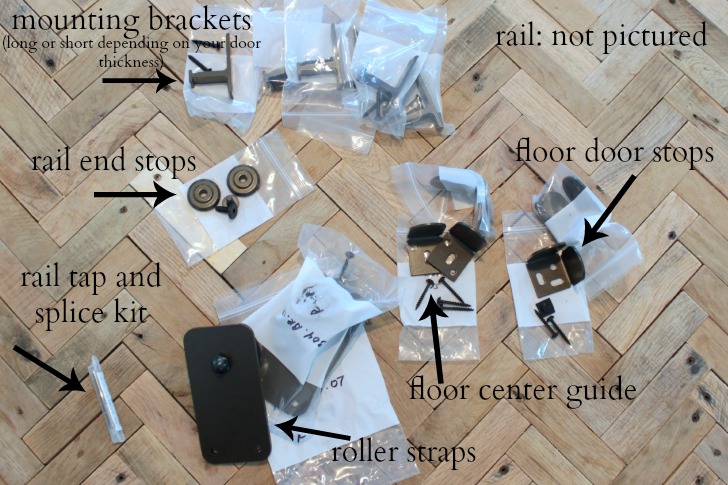
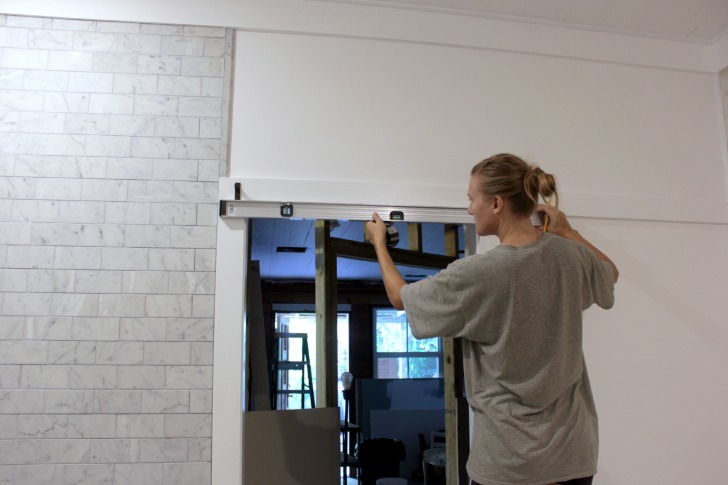
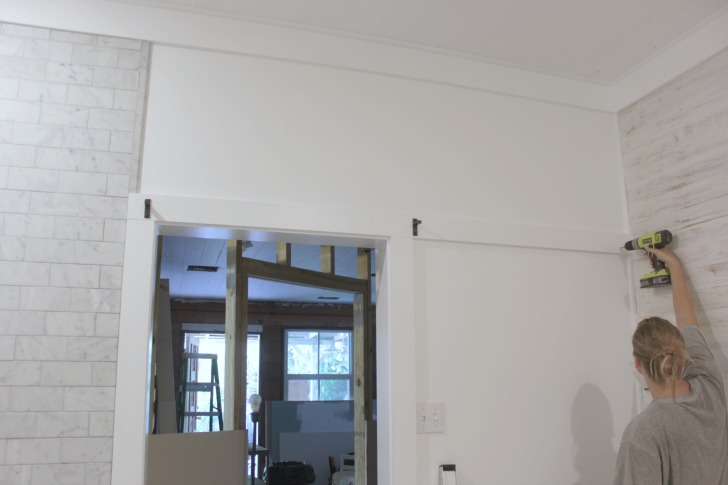
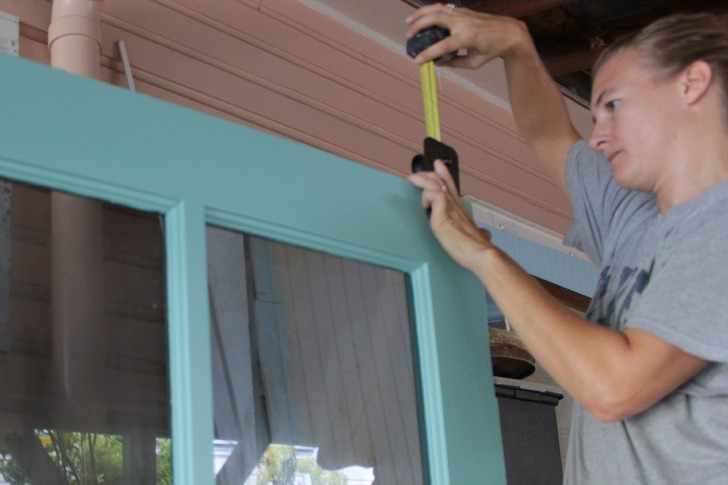
A little larger gap on the top would be fine. I tried to get ours just at 7/8″ and I can attest to the fact that you can kind of muscle the wheel over the rail if need be … ours may have been closer to 13/16″, if I were to pay attention to all of those extra hash marks on my tape measure. And if these fractions are making you dizzy, I apologize, they often have the same effect on me.

With the correct placement determined I held up each strap and measured the right height and distance away from the edge of the door and marked where to drill pilot holes. I double checked they were level with a small level.

rolling door hardware roller strap attachment

Drilling pilot holes with a bit smaller than the diameter of the screws you will use to attach the straps will really help make sure you screw them onto your door exactly where you want to. With your pilot holes drilled, hold your straps back up with your pilot holes exposed in the screw holes of each strap and attach with the screws provided.

Attaching the brackets and rail to your wall.

The instructions say:

1. The location of the rail is dependent on the height of the door, desired gap between the floor and bottom of door and desired overlay of top of the door to door opening.
2. Recommended spacing for the wall mounted brackets is 16”
3. The Short Bracket will accommodate doors up to 1-1/2” thick, the Long Bracket will accommodate doors up to 2-1/4” thick.
4. Wall brackets must be mounted securely into the studs behind the sheetrock. If the brackets are to be mounted to the molding surrounding the opening, the molding must be firmly secured to the wall framework

Here’s what I say:

There are a few keys here that you’ll want to keep in mind as you proceed:

1 – You will need to attach your rail to your brackets before attaching anything to your wall if you don’t have a long enough space to slide your rail onto the brackets after they are installed. There is a track on the back of the rail where the front “T” of the bracket slides into, securing everything into place. Since our shower glass wasn’t installed yet, I first attached the brackets to the wall and then slid the rail onto the brackets. So you may want to tackle these steps in your own order, like cutting your rail first maybe.

2 – It is imperative that your door is attached to a flat wall and on a level plane (plain?). If your wall has any curve in it or your rail is not attached totally level you could find it won’t roll properly, which would be a total bummer.

3 – Depending on the height of your door you may need to attach the rail so it sits at the same level as your door trim. You can either add little shims behind each bracket so the rail will be far enough away from your wall to not have the door trim interfere. Or you can extend the top of your door trim the entire length where your rail will go, like we did.

installing rolling door hardware

First, determine how high to attach your brackets (that’s what I’m measuring in the photo above). Add the full height of your door (ours is 79″) plus the amount of gap you want between the bottom of the door and the floor (our is 3/4″) plus the height of the rolling strap you installed on the door (remember all of those fractions, ours is 7/8″) and you’ve got your measurement.

Again, drilling pilot holes will ensure your brackets end up exactly where you want them to be. I installed the first bracket and then used a 4 foot level to determine the correct height for the other brackets.

installing rolling door hardware

For our door I only used 3 brackets and installed the two end brackets 2″ inside the end of the door trim and the third directly into the center. Our wall is solid wood so we had a lot of flexibility in placement. And our door won’t get a lot of use so I don’t anticipate any trouble, but I’ll let you know if we end up going back and adding more brackets.

For our door I only used 3 brackets and installed the two end brackets 2" inside the end of the door trim and the third directly into the center.  Our wall is solid wood so we had a lot of flexibility in placement.

A hack saw can easily cut through the rail to make it the correct length and the rail tap and splice kit re-thread that cut end so you can screw in the end caps after you attach the rail to the brackets.

Then, ideally with the help of a second set of hands, mount the door with the rolling straps onto the rail.

rolling door hardware in the master bathroom

And as for installing the end stops and center guide … well, I didn’t. 🙂  This door really isn’t going to get much use, our bathroom is inside our closet that is inside our bedroom, and the two of us who live here are the two who will be using the bathroom. When we have company we’ll most likely close the bedroom door anytime we want privacy in the room and I just didn’t want the added hardware. The door is also aligned so the wall serves as a stop at one end and the shower curb serves as a stop at the other.

The instructions say:

1. After installing the door onto the rail, slide the door to the desired opened position.
2. Install the End Stop bracket to the floor or wall so that the door stops in the desired opened position.
3. Install the Center Guide bracket so that the door will always be captured by this bracket in the fully opened and fully closed position.
4. Repeat step #2 for installation of the other End Stop bracket when the door is in the closed position.

Our rolling door hardware has been installed for almost a month and I love it. I can’t wait to get the closet finished so she has a prettier backdrop than the unfinished room, but for our otherwise all white bathroom I love the pop of color on the door (Behr Marquee, Eggshell sheen, Cascade Green) and the contrast with the dark rolling door hardware.

It inspired me to add a little more color with the Curacao skyline canvas a friend of ours gave us mounted over a little bit more scrap wood found in our crawl space.


easy to install rolling door hardware, step-by-step instructions (including what you really need to get right!) from thespacebetweenblog.net

There are so many designs and finish options available, hop on over to Rolling Door Designs to start picking out your favorite.

And check out more about our master bathroom remodel like the DIY wood vanity, reclaimed wood mirror frames and the Carrara marble tile.

  • « Previous Page
  • 1
  • …
  • 12
  • 13
  • 14
  • 15
  • 16
  • …
  • 169
  • Next Page »

Copyright © 2025 · custom theme design by this bold girl · Built on the Genesis Framework 

  • pinterest
  • facebook
  • instagram
  • rss