This post may contain affiliate links which won’t change your price but will share some commission.
TGIF everyone! Do you have anything fun planned? For a couple of old souls we are getting ready to party like thirty somethings rock stars. 3 of my husband’s colleagues are having going away gatherings before they head off to their new adventures. Party starts at bedtime 9 pm tonight, wish us luck.
The first of the 2 part Breaking Dawn movies comes out! Yes, I love the series. No, I wasn’t planning to and don’t have any weird vampire or werewolf fetish. I don’t know exactly how it happened, it just did. And I have very little no shame about it.
The final NASCAR race of the season is Sunday. I do have to recognize the reigning 5 time champion, Jimmie Johnson. He has no chance of six-peating this year so this is the final weekend, after over 200 weekends in a row (Now that is a phenomenal stat!), that he will be referred to as the reigning champ. It’s been a great run 48. Nice job!!

Then, the Patriots play Monday night football. Woo Hoo!! The big downside to MNF here on this little island is that we are Atlantic Time Zone, one hour ahead of EST now that all you woosies have fallen back. Meaning the game starts at … wait for it … 9:30 pm. Are you kidding me?!?!?
But, before all that happens, check this out. When I got back from a recent trip to visit family I came home with these cuties.

The school pics, not the actual people, unfortunately.
Meet 3 of our 5 nieces and nephews. Aren’t they beautiful looking people?!?! I just love them!! They are actually the I, C and O of Mico. M hadn’t had her pictures taken yet. And just for the record, #5 wasn’t around when we got our baby, we didn’t just pick our 4 favorites to use as an acronym. But, now that there’s 5, we could do that next time.
I kid. 🙂
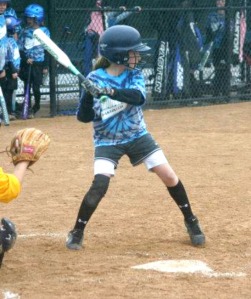
Just to be fair, here’s a pic of M getting ready to hit one out of the park.
 And #5 learning some soccer moves. 🙂
 Ahhh, remember the days of school pictures?
 Picking out my favorite outfit My mother making me wear an outfit of her choice, the awkward smile, the braces, the spiral perm! Oh Lord! Let’s just focus on these cuties shall we.
I wanted a simple way to display the photos, and you know me, I didn’t want to spend any money, and I also wanted something that was easy to transition. Before you know it there will be a whole new set of pics next year, or maybe even photo Christmas cards to display.
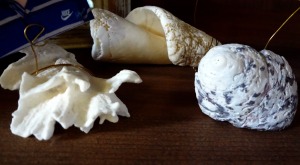
So, I took some items from my stash 0′ beachness, some wire and teeny little clothes pins (both items I had gotten on super duper discount last year when one of our home improvement stores started liquidating to prepare for a huge remodel) and a pair of needle nose pliers and in just a few minutes I had these.

Cute, huh? And they fit in perfect with the rest of my seaside decor, and are easy to move around as my mood dictates.
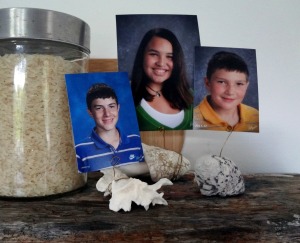 In the kitchen on a driftwood shelf with some rice.
 Or on a side table with a rock and some more coral maybe. Just so versatile I tell ya.
Here’s what I did and literally took just a few minutes per photo stand, or maybe place card holder even. Wouldn’t these be cute for a nautical inspired dinner party or even Thanksgiving table scape?
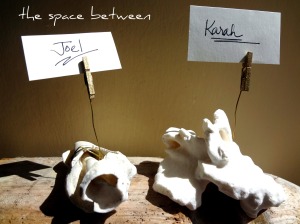 Yes, I’m clearly trying to get creative with photo spots. Here’s the deal, we get very little natural light in our house. Which is AWESOME when you live 12 degrees from the equator. But not so awesome for great photos. I’m just getting started here peeps, let’s hope I get this all figured out.
So, this is really all you need.
 Note, I didn’t end up using the twine at all and used more pieces of coral. The pieces of coral or shells that had a hole in them to wrap the wire in were the easiest.
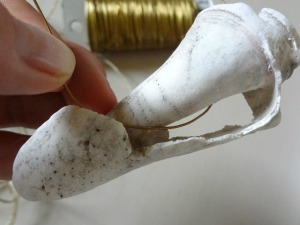

Just wrap the wire around a few times until it’s secure and then cut off at the desired length. Depending on the gauge (that’s a fancy word for thickness) of the wire you could make really tall holders if you wanted to. If using the clothes pins, just glue and set and you’re done.
But, if you want to make a little curly cue with the wire just take the needle nose pliers and wrap the wire around the tip of the pliers a few times. Like so.
 Then squish the curlies together so they are tight enough to hold a picture or place card. Like so.
 Then ta daaaa! You have simple, cute little picture holders, place card holders, maybe even love note holders if you are someone so inclined to write that sort of thing and leave it out for your spouse before they leave for work.
A close up:
 And one more pic of I, C and O because there are never enough of those. 🙂
 Super easy and super cute, I think. What about you, what do you think?
I am sharing this project here, here and here. Check ém out!
Just for fun, this is a house I pass pretty much every day, it’s in a nothing special part of town but I just love the pride of ownership and curb appeal they maintain at this quaint little Caribbean abode. Enjoy!


Deanna says
Seriously, when did X get so BIG?! And so handsome! P.S. I’ve concluded that I could never be a blogger because you have take close up pictures that include your finger nails and mine are always a mess! Yours look great 🙂
Karah @ thespacebetweenblog says
I know, right! It is hard to believe how quick they grow up. He is such a cool kid, too!! And the nails, um, yeah, there are definitely many retakes once I see them on film. And to be fair I only have 9 to keep track of so that’s practically cheating. 😉
X's Dad says
There really should be no surprise at how incredibly handsome X is, after all have you seen his dad!!!
Karah @ thespacebetweenblog says
First, I prefer to refer to him as #5. 🙂 And second, since we know his dad, our surprise at his handsomeness shouldn’t be a surprise to you. 😉
Megacrafty says
Love your project- it’s a great idea for all those shells I’ve collected. And go Pats. : )
Karah @ thespacebetweenblog says
Thanks! And a Pats fan, too. Love it!
Lauren says
Very nice!
Jamie says
Those are amazing. What a great idea.
Would love to see you DIY Home Sweet home.
Jamie
http://diyhshp.blogspot.com/
P.S. I have another giveaway going on right now. Would love you to stop by and check it out.
P.P.S. I have a linky every Monday. Would love for you to stop by and link up.
marissa says
this is a great idea I think I’ll have to make some for Christmas presents I’d love it if you would add this to my party over at http://raegunwear.blogspot.com
Sherika Alston says
WOW! How creative are you! I love them! Would love for you to come link up @ passionatelyperfect.com! We also have a fab bag giveaway going on!!
Maggie says
Happy Thanksgiving, inviting you to share your project with us at
http://www.passionatelyartistic.com/2011/11/happy-thanksgiving-2011.html
Have a fabulous shopping weekend.
Maggie
http://passionatelyartistic.com
Jennifer says
Very nice!!
Thanks for sharing at Show & Share!
Karah @ thespacebetweenblog says
Thanks so much ladies for the link party invites. I’ve eagerly joined them all and have them bookmarked for weekly participation. I appreciate the kind comments!