Hey, hey! Hope you’re day is splendid so far. Today I’m going to tell a story about how I started with this:

Yes, I did notice that the top drawer is in the wrong spot. No, I don’t have any idea how long I’ve been living with it like that. Attention to detail, check! 😉 Wait, could that be a big a$$ tv on top of the dresser? I doubt it. 😉
And ended up with this:
Well, I’m not exactly done yet. Let’s hope it turns out great, shall we?!?!
For a little background, this is one well traveled dresser. I inherited her when I moved into my first apartment at college and she has made the cut on all the moves since then. Funny how something can go from being the “Oh My God, I have my very own furniture” piece to the “Let’s take her to Curacao, we won’t mind if we need to leave her behind on the next move” piece. She’s nothing more than particle board, but I like the dental molding detail and the functionality. And, who doesn’t always need more storage space where ever you live? Add one to the good decisions column when tallying my “move essentials” choices. Score! (Some of my questionable choices can be found here.) Which column do you think this guy is in?
Seriously, who isn’t going to want to sit around knitting a scarf when it’s 90 plus degrees out every. single. day? Me, that’s who’s not. And besides, I don’t have my Mamie or Grammie here helping me every knit and pearl of the way so there really is no hope for this project.

But, I digress.
Now, you’ve probably all seen the abundance of map usage around the web in home decor. I personally think it’s Awesome! But, when I pulled out some maps we had here (No, no maps made it on the essentials list for the move to Curacao!), most were really colorful renditions of Curacao. Bright, Caribbean colors sure do make me smile. But I wasn’t sure they were meant for my dresser. So I just made my own. Just quick and easy like. 😉

It really was pretty easy. I google searched images of 4 meaningful locations to us (Joel and I, not the dresser and I). Maine – where I am from, Iowa – where Joel grew up and went to college, San Francisco – where Joel and I met and Curacao – where we make our space today. 🙂 I picked between 4-6 images for each location, uploaded them into picnik.com and updated them to my liking. Increasing exposure, making some with a sepia finish, basically giving them a little more muted look. I then copied them into Word and increased the image size as much as possible without making it too blurry. Although, I didn’t mind a little blur either.
I did end up using one full map of Curacao. But it’s the bottom shelf, and I’m not totally sold on it, but I’m not jumping to redo it right now either. But there’s more on that in a bit. 🙂
I started laying out the maps and realized I wanted to rip the edges to give it a more haphazard feel. More intentional imperfection, my specialty.
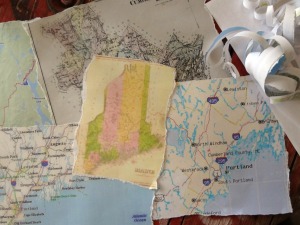 Then I played around with some configurations, with a little help from this gal:
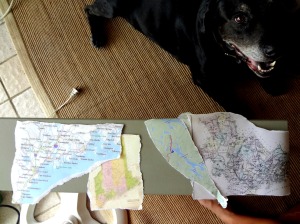 Then I consulted the supervisor to see if she liked my final placement:

Please Note: No glue guns or electric screw drivers were used in the making of this project.
Truth be told, this step took me FOREVER. I just wasn’t sure what I was looking for. I tried muting these maps even more. I wanted ocean pics for Maine but wasn’t loving the blue. Uhhh, not sure what I was expecting exactly. I hemmed and hawed for a few days and based on the pics on my camera I made another, larger Driftwood Christmas tree (more on the trees I’ve made here),

watched a beach wedding get rained out (or, I guess, rained in) at a local hotel,
and got a rose from Tito el Bambino at his concert.
 Sorry for the bad pic, it’s actually from Joel’s phone. That’s me pointing to my rose, that’s Tito el Bambino up on stage and yes, I am wearing a wife beater.
After all this fun, I couldn’t ignore my indecision any longer and decided to just go for it and map up the dresser drawers. I could always paint over it if it went totally wrong, I hoped.
So I took about this much glue:
 Added about this much water:
 I know, really pretty pics and super detailed information. 😉 I would say I used about 2 teaspoons of glue and 2-3 times that amount of water. And that was enough to glue on one full drawer of maps. I used a tattered paint brush to apply it and my finger tips to smooth out the maps as best as possible. TIP!!! If you print your own maps go very very gentle with the smoothing process, it IS just plain paper after all.
All the edges were a bitch lot of work. So much so, that I realized I really liked the look of the torn map over the current green paint more than I liked trying to get the map to stick all the way around. Problem solver I am! 🙂

 Woot Woot Cumberland County, Maine!!
This is what the drawer looked like all glued up:
 TIP!!! Be sure to push out the handle holes while the glue is still wet. Glad I got lucky and did that myself.
And this is what they look like drying in the sun and waiting for some handles (and getting a final inspection from Mico). Not sure if you can tell from this pic but the glue/water combo does dry clear.
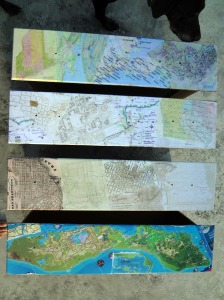 Yessirree Bob! I sure did glue that Curacao map on upside down! What was that about attention to detail? Ack! Anyway, live with it for awhile I will.
This process took me most of half a day. Printing the maps, coordinating them on each drawer and using one coat of faux-cou-page under each map and then 2-3 more on top. The Curacao map was the hardest for me because of the thickness of it, and apparently because it wasn’t meant to go on that way. Ack, ack! I really am loving the look of the maps I printed. I am loving that they represent places meaningful to us.
 Chesuncook Lake and the Greater Portland Area of Maine. These places just plain make me smile. (I actually created the watered down look of the Chesuncook Lake map. We’ll call it intentional imperfection.)
 Go Cyclones!
 Joel and I lived together for the first time in South San Fran. I will always love that place for that one reason.
 And we now live somewhere on this map.
But, I’m still not sure how it’s all going to end up, upside down island and all. Ack, ack, ack!
I made this braided rope handle awhile back, when I thought new handles might be a good, simple transformation for the dresser. Now I just need to make 7 more.
 Then, cross my fingers that I like it all. Will I want to repaint the rest of the dresser? Will the handles work with the maps? Will the upside down Curacao drive me batty? What do you think? I would also love to get rid of the curvy detail at the bottom of the dresser, but cutting that off would require I repaint the whole thing, and I just don’t like to have my hand forced like that. What would you do?


