This post may contain affiliate links which won’t change your price but will share some commission.
fThere was a time when I thought building a closet was going to be super complicated.
I actually spent wayyyy too much time online researching closet systems.
But nothing was exactly what I wanted and everything seemed really expensive to me.*
*”Uhmmmm, everything always seems expensive to you” my sweet husband chimes in. “Well, I would hate to have to dip into my secret Caymen account.” I retort.
And so we decide to build our own:
Easy DIY wall to wall closet
This was also the perfect opportunity for me to try out Purebond plywood. If you haven’t heard of it, it is a made in the US, formaldehyde free plywood made with wood from sustainable forests. Oh, and it’s gorgeous. Thank you Purebond for supplying the plywood for this project!
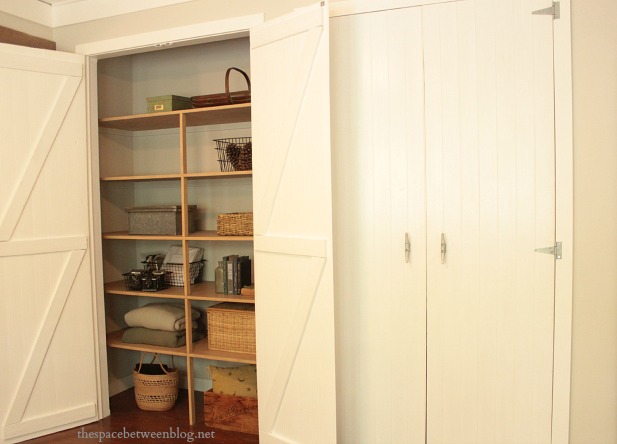
Here’s the sneak peek I shared of the closet already.

And here’s the whole thing.

We kind of love her. 🙂
And this design is incredibly easy so let’s get right into our easy DIY wall to wall closet.
Side note: We have discussed a few times here about framing, and some of you admitted to eyes glazing over and headaches and feeling the need to drink away your confusion, so we’re not going to go into technical detail, but we did frame in the two openings for the closet using the same concepts and similar techniques as here and here.

A few tips:
- Decide what you are doing for doors FIRST, this will determine how big your openings need to be.
- Run one 2″ x 4″ along the ceiling at the distance you want away from the wall and run a 2″ x 4″ down to the floor along each side wall.
- We essentially created 4 boxes. One that goes the entire length of the closet above the doors, one on the right side, one on the left side and one in the center.
- Since we were going wall to wall (132 inches long) we decided we wanted two sets of doors, having that center part framed in really ended up helping us hide some of the structural elements of the closet shelves. We like happy accidents.
Definitely don’t hesitate to email me if you have any specific questions about the framing.
And, we had the whole space primed and painted first, I definitely recommend doing that, too, if you can.
When it comes to the closet shelves, we had the nice guys at the Home Depot rip the 4 x 8 foot sheets of Purebond to 24 inches. Our closet depth is actually 27 inches, but the 24 inch cuts made the most sense since it’s exactly half of a full sheet of plywood. We got 4 sheets, so 8 pieces total.
Try not to be jealous of our living room workshop. 😉

Once I had them home I created an assembly line of sorts. And this is how I got them ready to install.
Shelf Prep Steps:
- lightly sand each one
- wipe all loose dust away
- wipe each one down with mineral spirits, let dry
- stain with desired stain (I used ZAR brand in a Driftwood finish), let dry
- flip and repeat all steps

I’ll be honest, I did polyurethane 3 of them, but didn’t get the rest finished by the time we got around to installation and I don’t think I’ll bother to finish that step. I’ll let you know if I grow to regret that decision. 🙂
There is also some prep involved for the shelf support pieces.
Support Supply List:
Quantities of each item will depend on how many shelves you’re making.
- 3/4 inch MDF cut in 2 inch strips to run along the back and sides of each shelf, primed and painted the wall color
- 2″ x 4″ braces cut the height of your shelves minus 5/8 of an inch, these will be hidden
- 2″ x 4″ braces cut the height of your shelves minus 5/8 of an inch, primed and painted the wall color
- 1″ x 4″ strips cut the depth (from front to back) of your shelves (this is what they’re called at Home Depot, they are actually only 5/8 inches thick), sanded and stained the same color as your shelves
- 1″ x 2″ braces cut the height of your shelves, stained to match
I’ve been working with my fair share of trim pieces these days and I have become a fan of the 6″ roller for the ones that need to be primed and painted. For the 2″ MDF strips I just grouped them all together and rolled all at once.
So much faster than the brush!

And, knowing that these were getting screwed into the wall right under each shelf, I only primed and painted one side and one edge.
And here’s where that center wall proved to be in the perfect location to hide extra supports.
Our closet is 132 inches long.
Each piece of plywood is 8 feet long.
That left the perfect little 3 foot section for hanging clothes on the right of the closet.
So, for ease of everything we made our shelves 8 feet long starting on the left side of the closet and supported them on 1) both sides, 2) all along the back, and 3) with two additional supports for the front of the shelf. One of the supports is hidden behind the center wall and the other is a 1 x 2 stained to match and lined up with the center of the door opening.
We definitely don’t anticipate these guys will ever sag. 🙂
Let’s take a look at some pictures.


Shelf installation process:
- attach 2″ MDF strips to back and side wall (check for studs with a stud finder or use anchors) with an electric drill and 1 1/4″ screws, entire support will be 8 feet long with a 3 1/2″ gap for the 2″ x 4″ behind the center support
- attach primed and painted 2″ x 4″ support to back wall, centered behind the center wall, with our framing nail gun
- attach other 2″ x 4″ support to back side of center wall, lined up with the 2″ x 4″ attached to the back wall, with the framing nail gun
- attach the 1″ x 4″ stained strips to the top of each 2 x 4″ support with the framing nail gun
- lay shelf (we actually haven’t even attached our shelves down into the supports … but fully plan to … someday … maybe)
- repeat for each shelf
- we added the 1″ x 2″ supports in the front of each shelf, centered in the door opening, at the very end.
You could definitely nail everything in with 3 inch nails and a hammer, it would just take a bit more woman power.
Once we got the third shelf installed we decided to add the vertical board that would separate the hanging section of the closet. In hindsight, we could have just as easily added the 4th shelf first, either way will work.

And then we paused to appreciate a puppy who is not a huge fan of the noise of the nail gun and compressor.

And then we went back to using the nail gun.

This time using the finish nail gun, Joel acted as the eyes (scary, I know) to make sure each shelf was at the right height and that I had the gun lined up straight and we nailed the new vertical support right into each shelf.
And you may want to wear safety glasses, if you’re safe like that. 😉
More supports to come, but we wanted to get all of the shelves installed.
The top two shelves went a little different just because they needed to run the full length of the closet, and we were still working with 8 foot long sections.
For the fourth shelf, that lines up with the top of the hanging clothes section, we used the full 8 foot piece again and then cut a piece to fit the rest of the way.

For the top shelf we actually decided to cut down two 8 foot pieces so the seam would be hidden behind the center wall.
Just personal preference on that, because that did leave us with smaller pieces leftover, which isn’t awesome.
But the idea I’ve got brewing to use those pieces for might just be awesome. One can hope. 🙂
This shot shows one of the 1″ x 4″ supports that runs under each shelf from front to back on top of the 2″ x 4″ braces and hidden behind the center wall.

For the hanging rod I was able to cut down the rod we had taken out of the previous closet with our reciprocating saw, and I just used scrap pieces of the 1″ x 4″ cut to the same size as the rod supports.
I just clamped the two scrap pieces at the same time to a 2 x 4 and used a hole saw the same diameter as my rod to cut holes in them. The hole you cut out will stick in your hole saw so just remove the first one before trying to drill all the way down through the second one.

You could just buy a set of rod supports that are easy to screw in, but they were about $5 and plastic and the hole saw was about $6. I’d always rather spend the money on a tool I will be able to use again. #toolhoarder
That 2″ x 4″ underneath is key so you don’t accidentally drill into any nice wooden tables. For those of us who tend to do home improvement on their “nice” furniture. 🙂
You will need to cut more of an opening on one side so you can slide your rod in and out. I just drew a few lines and cut out what I thought would look good with my jig saw. It’s nothing fancy.

Big important tip here!! Be sure to use nails short enough that they don’t go all the way through the 3/4 inch vertical board when you’re nailing your rod support in. I came thisclose to making that mistake.
Holy cow I would have been so ticked at myself.
A little sanding and staining to match and they pretty much blend right in. And I love the look of the galvanized metal rod.
And the painted supports under each shelf all but disappear in there after a little spackling, caulk and touch up since they are painted the same color as the wall.

We added a little 4 inch high baseboard around the bottom and magically made the edges of the plywood look like wood with stainable Birch (to match the plywood) edging. (Link to check out the product at the end of this post.)
Edge banding is an iron on stainable wood veneer. I ironed it on the 4 shelves that were the full 8 foot length first and then stained it to match. For the vertical board and the two top shelves I actually stained the veneer first and then ironed it on after the closet had been built. I wanted to run the veneer the full length of the closet without a seam.
The only hiccup being where the iron didn’t fit behind the small wall sections. We just used a few blocks of wood to ‘clamp’ the edging to the shelves and wood glue to secure those sections as best we could.

Honestly, if I were to do it again I’d probably just buy more 1″ x 2″ strips, stain them to match and attach them to the front of each shelf. It would have been slightly more expensive, which is why I went with the edging in the first place, but the install with finish nails would have been easier for me.
I may have cursed that sliding edging and the hot iron close to my delicate little fingers and all the little trimming of excess edging and glue a few times.

And for those of you who actually use your iron for clothing (weird!) you should use a rag between the edging and your iron to prevent any glue or stain (if you are in the stain first, iron later camp) from ruining your iron.
I tried that for a hot second until I realized I needed to actually see if the edging was lining up with the plywood, so good luck with that. 🙂
But, it’s hard to even remember this wall used to look like this.


Oh, and doors would be nice, right?!?! We’ve tried our hand at DIYing four of them with some hopefully fun details. As soon as the hardware store gets restocked with hinges we should be able to install them so I can share the whole deal.
Update: The doors are finished and hung, and I learned a few things about my husband along the way, read all of the details here.
And hopefully they fit the openings perfectly. What are the odds of that actually happening?
Either way, doors will be a huge success in Joel’s eyes since he likes to claim this closet as “the perfect place for old cameras and pine cones and a pillow in a crate”.
Hmm, someone might have thought I was going to unpack the boxes we still have in our kitchen and dining room and get a little organized. Oops. 😉
And for anyone looking to tackle this project, here are a few affiliate links to some of the tools we used:
- Wood Veneer Edge Banding
- framing nail gun
- compressor and finish nail gun
- electric screw driver
- stud finder
- hammer
- hole saw
- reciprocating saw
And if you’ve missed any part of our Key West home renovation you can get caught up right here.


cassie says
that looks awesome! 🙂 love the storage!
Karah says
thanks cassie!!
Jordan@the2seasons says
Wow that looks great. We have been looking at closet systems for our tiny master closet. It is also angled which adds another challenge. It was great to meet you at Haven I am just now getting a chance to check out all these amazing blogs. Enjoy your time where you are living now.
Karah says
Good luck with your closet! The functional storage is making such a difference!!
Anne@DesignDreams (@ddreamsbyanne) says
Great job Karah!
Karah says
thank you so much, Anne! hope you’ve had a great summer!
Jena says
Love this Karah! I’m totally pinning this for reference because I have the saddest closet system complete with sagging plastic rails (not due to me over stuffing them with clothes or anything). And what is that your yellow shirt says…something about Beer Pong? LOL
Karah says
Hahahaha, nice eagle eyes!!
Marilyn says
Wow, I love this closet, Karah! You and your hubby make it look so easy. (Your dog is a cutie!)
Karah says
It really was simple!! And Marley says thank you!
Ashley@AttemptsAtDomestication says
Oh my gosh! That closet is amazing! Look at all the shelves! Any chance you want to take a trip up to Virginia and build one for me? 😉
Karah says
YOU can do it!!! Get that Jesse to help. 🙂
Megan @ Our PInteresting Family says
Looks so wonderful!!
Karah says
Thank you so much, Megan!!
Vonda says
It looks so pretty is doesn’t need doors, but then again, it is a closet so the traditional me says ‘can’t wait to see the doors!’
Karah says
I know, right!?!?! If only I could keep it styled like this every day. Plastic storage bins are going in and doors are going up hopefully tomorrow!! 🙂
Miss Charming says
Great job, Karah!
Karah says
Thank you so much!!!
Traci says
I have to confess, I skimmed over all the construction details. But I love the finished product, it looks lovely. My favorite picture in this post however is the one of your sweet dog.
Traci
Karah says
I don’t blame you, Traci! 🙂
Natalie says
did you have a building permit already for this? or your state doesn’t require a permit for these types of things? or you don’t know?
Karah says
It totally just depends on your local area, Natalie. Our city requires a permit for any projects that cost more than $600. Although this project cost much less than that, since we are in the midst of a full house remodel, we did aquire all the appropriate permits before starting our renovation. But just check with your local city, or even google your local city and “building permit requirements” and you can find out your local requirements.
karen@somewhatquirky says
Looking good Karah! Very nice job. This should really help you unpack a little!
Karah says
OMG, the unpacking has been so fun!!
Karah says
Good idea on the curling iron, it’d be funny if I actually bought one for DIY projects 🙂
nest of posies says
this looks fantastic! awesome job!
Karah says
Thank you so much!!
Heidi @ Happiness is Homemade says
This looks great, Karah! We’re going to work on my closet next weekend, so I’ve got this pinned for reference!
Karah says
Thank you so much, Heidi! Have fun with your own closet!!
justagirlabby says
Awesome project! I am so impressed! It looks so great, and I think the pillow in the crate is adorable. 😉 I popped over from Home Stories A to Z– thanks for sharing!
~Abby =)
Karah says
Thank you so much, Abby!
Malia says
It looks amazing Karah!
Karah says
Thanks Malia!!
Shawn Wilkie says
We are looking to make a closet in our rental home and I think this would be great. Any idea of total cost of closet including doors? Approx ok.
Karah says
I Shawn! I do keep a budget page that itemizes the cost of all of the different items we’ve used along the way, sometimes it’s hard to keep track by project as I tend to be working on a number of different things at one time. 🙂 You can see the full rundown here, https://thespacebetweenblog.net/key-west-house-renovation-budget-breakdown/. But it looks like the wood for the doors cost about $100 plus the cost of whatever hinges and knobs you use. And the shelving and support boards cost about $200. I hope that helps!
maggie says
I have concrete block walls. I am thinking of turning my spare room into a DIY dressing room. How can I tell how deep I can go in the walls?
Karah says
There are anchors specifically for concrete walls.
Margaret says
Hi. These shelves look so nice. I’ve saved your link for years waiting to try this.
Can you tell me how you attached the 1×2 closet supports at the front of each long shelf? The ones that run from the bottom of one shelf to the top of the next and look so delicate. Did you use the nail gun to shoot through each shelf and into the upright?
Thanks,
Margaret
Karah says
Hi Margaret! I am so sorry for my delayed reply, you’ve probably found your own solution, but yes, I just used a dab of wood glue and finish nails straight into the 1x2s from the shelf.