end of year organization

Does anything say “it’s the end of the year” like a little organization?  I mean, really. Clean slates and new years go together like bread and buttah. I got my new 2012 daily calendar last week and it just made me giddy.  I’m officially ready to start the new year when I’m prepared to get it all written down in the calendar. (Did I just say that out loud?  Total dork here.) I also make sure I shave and put away laundry before New England Patriots games start. I just don’t want anything nagging at the back of my mind.  Apparently piles of clothes and scratchy legs are my biggest nags.  Hmmm? It’s kind of the same for me with the new year.  Who wants a hot mess of disorganization distracting from all of the new possibilities the new year brings?  I sure don’t.  :) Well, my mini organization actually started when I started this blog in the beginning of November.  It’s so much easier to get things done when things are in order and ready to be gotten done.  But, as I’ve mentioned many a time, we don’t exactly have a lot of space, so I need to maximize what I’ve got and just make it work.  You know? I can dream of spaces like this: Like Jen at Tatertots and Jello has. Or this, Like Stacy at Not Just a Housewife just created.  Aren’t those wood shelves the best?  She made them from old fence pickets.  I see myself making something like it very soon.  :) But, what I’ve got is this, Underwhelming, I know.  Trust me, I KNOW! But, here’s what I did.  I laid out everything that I had in terms of “craft supplies”.  You know, all of the scraps, paints, adhesives, items I’ve bought in hopes … continue reading

2011 Shout Outs!

As 2011 comes to an end I feel inspired to give a big fat Shout Out! to everyone who took the time to Shout Out! about me at some point this year. Yes, I do realize that I’ve only been doing this little blog thing for a couple of months so it’s not really a year worth of shout outs.  But, it is the end of the year, and I’m all about tying up lose ends so I need to be sure to give back the love. These lovely people took the time to feature me in one way or another and I want to shout from the roof tops how thankful I am for that.  It sure did help me reach more people than just a few family members and friends – who are basically obligated to follow along anyway.  ;) I encourage everyone who takes the time to read my blog to check out at least a couple of these guys as well.  If you click their buttons below you will be redirected to their post featuring my project (because it really is all about me) but take a minute and browse around their blogs as well.  I mean, they clearly have good taste if they’re featuring my stuff.  :) {Decorated Driftwood Christmas Tree} – These guys featured my post highlighting the fully decorated driftwood tree with all homemade ornaments.  Remember, the tree with lighting and ornaments cost less than $15 total.  Merry Christmas to me! {Homemade Christmas Ornaments} – These guys featured my post with the tutorials on how to make a beaded snowflake, book page star and light bulb ornament.  The ornaments that only made it through the ringer one time.  One time. Do you know the old school song that says that.  ”One time.  One … continue reading

for the love of LL Bean {canvas bags}

Happy Happy Monday!  And Happy Day After Christmas!  I sure do hope everyone got exactly what you were hoping for, large and small.  :) I’m thinking a lot of people are going to want to spend more time with loved ones this week than online (hoping many of you are on vacation, fingers crossed for you) so I’m going to just do a couple quick posts on some simple storage and organization solutions.  I figure I’d consider this first one part of the Monday Matinee series that I started here.  Uhhh, this is the second one so that constitutes a series, right?! Next week I’ll be posting about a VERY FUN project I’m working on now.  I will also be traveling to my home state of Maine and hopefully get to see some snow for the first time in THREE years.  IIIIIII’m dreaming … of a whiiiite January.  :) So, onto my love of all things LL Bean.  I mentioned here that I have a bag o’ bags.  Well, I actually have two. We got two awesome monogrammed canvas bags with pictures of pups on them from my brother and sister-in-law a few Christmases ago.  I love how they represent our whole little family.  Joel, me, white dog and black dog.  :)  They made the cut when we were packing “only the essentials” for our move to Curacao just over 2 years ago.  If you ask my husband I made all kinds of interesting choices.  Some were mentioned here, here and here. I was thinking these would make great beach bags, I was also thinking I would be frolicking at the beach quite often, moving to an island and all, right?!? Turns out, when I am at the beach, once in a great while, nothing says “American Tourist” like a monogrammed canvas … continue reading

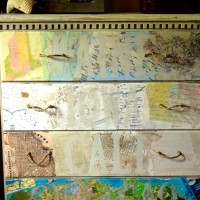
mapped, dressed and done

I did it.  I finally finished the dresser. And it was really more like mapped, dressed, braided, jigsawed, sanded, painted and done.  :) I explained how I got it started here.  Then I got a little distracted by a little thing called Christmas (are you guys ready for it?) and went a little ornament crafting crazy.  If you haven’t been keeping up (where have you been?) I put all my projects in one handy spot for you to check out here. Now, for the dresser, I’m lovin’ the upgrade.  It reminds me of where we have been, where we are now and makes we wonder where we’re going next. I let the drawers sit for a bit with the maps on them.  I didn’t even put them back in the dresser to use.  I just used this always essential chair (more on that here) to toss organize what would be in the dresser.  Apparently even if I have to step over a project 10 times a day it does nothing for my motivation to finish it.  ;) One day out and about I found these letters at a local scrap booking store and had the idea to stencil on the names of the locations that each dresser represents. They didn’t have all of the letters I needed so out of a cereal box (love me some Honey Bunches of Oats) I made an O with a little help from the C I bought and an A with some M, N and W.  And yes, the M and W are exactly the same but I didn’t realize it until I got them home.  Bamboozled by the alphabet.  Drats! I mixed together a few different colors of craft paint I had to create a subtle color that wouldn’t over power the maps.  Honestly, each drawer came … continue reading

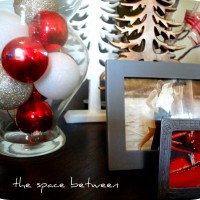
Christmas decor ideas {simple and easy}

Now, I think I’ve mentioned before that we live in a rental house that is slightly bigger than a bread box.  No?!?  Which really is awesome when it comes time for cleaning … or searching for something my husband I can’t find.  (I mean there are only so many spots he can put the clothes he had on yesterday.  Which is ALWAYS where said lost item is.) It’s also awesome when it comes to accessorizing, especially with some holiday decor. I’ve seen a lot of bloggers talking about how they’re going simple this year.  Understated and inexpensive.  I would say this is my decorating strategy all day everyday.  And that is even more exaggerated with such a small space.  Where exactly am I going to store bunches of holiday decorations in the off season? I’ll have to share some of our creative storage solutions with you sometime.  Can you say construction doors turned walk in closet shelving?  :) So, in addition to our driftwood Christmas tree, I made just a few upgrades. Just ignore all the cords, but hopefully the Charlie Brown Christmas on tv makes you smile.  :) Those tall lit things on the right are 3 bamboo poles that we keep out all year.  We picked them up at a beach here in Curacao, I cleaned ‘em up and coated them with clear varnish. For Christmas, I just strung them with lights and using really small gold clothes pins (that I also used to make photo/place card holders here) I displayed Christmas cards and photo cards from years past.  For the record we have one friend on it enough to get a card here in time.  Love the card Sue! An easy and festive card display.  I like to think it overpowers the blank piece of plywood hanging above … continue reading

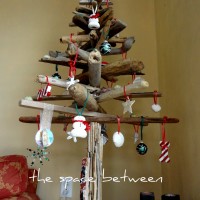
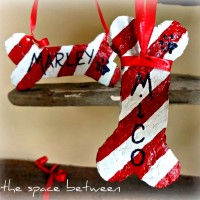
diy driftwood Christmas tree {with homemade ornaments}
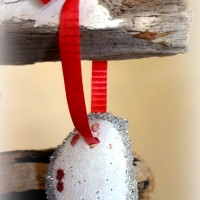
Hey hey!  How is everyone’s holiday prep going?  I am LOVING the holiday season this year but have to admit, I am ready to be done making ornaments and trees and move onto some other things.  I’m feeling just a little Christmas ornament crafted out, if you know what I mean. But, first I have to sincerely thank the Mega Crafty Christmas Tree Challenge for kick starting me into the holiday spirit this year.  With a budget of $20 we were challenged to decorate a tree at least 4 feet high and this challenge was the perfect way for me to get a little Christmas going up in here. I will recap everything I’ve made at the end of this post, but I want to first show you my scrap tree topper. In my very first blog post evah I explained how I make Driftwood Christmas Trees and I was able to use little pieces of scrap 1/4 inch wooden dowels left over from that project to make this. I cut 10 segments of the dowel about the same length and spray painted them red.  I first wanted to make it so the ends of the dowels overlapped and were exposed and the twine was used to connect the segments in a rustic way.  But to say I had some trouble with that strategy would be an understatement.  I don’t think the dowel segments were long enough to overlap, and I kind of lost my way on the way to making a star shape… Uhhh, that’s going to be a star, right?!?  And yes, I started this project the same night I made the beaded star snowflake.  Somethings just take longer to come together, you know? It was at this point that I unwrapped all the twine and decided I might … continue reading

glitter makes everything better

I made some of the easiest coastal Christmas ornaments yet. A few weekends ago when I went on my little shore excursion, I came home with a random collection of sea-ness.  I posted about the adventure here. I even found a fully intact light bulb that I turned into an ornament here. And used some sea urchins to make super cute snow(wo)men ornaments here. For all of the little shells I was left with I went with a super simple upgrade.  Drill a hole, glue on some glitter, add a red ribbon hanger and voila. Cuteness! Now, the drilling was not fool proof.  There were quite a few shell (and even one drill bit) casualties in the process.  I ended up using a drill bit intended for use drilling concrete.  It worked to get through the shells, but sometimes the little suckers still just fell apart. After drilling I brushed glue around the edge of the shells and just coated it with glitter. Super simple.  And just the right amount of bling to turn basic natural items into ornaments for our rustic little coastal Christmas tree. I also took a few shells that weren’t the pretty white color and painted them red and beglittered them for a few more coastal Christmas touches. While doing this process I also figured I could use the glue and glitter to cover up some bauble blemishes. Have you guys all seen the beautiful ornaments that Miss Mustard Seed has made? Including this one… I ended up with a similar result on my green baubles, and the glitter covered up all the scratches that had been there.  Score! I also glittered the top piece that holds the hook in because it was gold and my glitter was silver.  I just coated it with glue and … continue reading

diy salt dough star fish {ornament}

It’s gettin’ hot in here.  Which isn’t good for these guys. Well, to be honest, it’s always hot in here.  We are only 12 degrees from the equator here on this little island.  But it’s this time of year that gets pretty humid.  We call it rainy season, some of you others know it as winter.  ;) I actually don’t mind the rain, it often brings down the temp and honestly, who needs sun every. single. day? But, the down side is the humidity, you can just feel the moisture.  And it definitely took it’s toll on my salt dough starfish. I actually didn’t take any pictures of the destruction in action.  I was just so irritated that my ornaments were literally swelling and falling off my tree.  Man that Christmas spirit can be fleeting.  :/ I got the salt dough starfish ornament idea from the Desperate Craft Wives who had made a starfish garland out of salt dough for a nautical inspired bedroom.  Didn’t theirs turn out so great.  Kinda makes all you coastal lovers want to try it, right?!?!  Super easy, 3 ingredients,  bake for a few hours and enjoy. Not so fast. 1st – These are the temp options I have on our gas stove. I went all the way to the – sign and the little suckers still looked like this after about 20 minutes.  Drats! Take 2 – I baked for a very short period of time.  The ornaments didn’t burn, they weren’t 100% dry (clearly!), but I figured they’d do.  Wrong!  They weren’t really the right color so I painted each one, added a ribbon hanger and they were down right adorable on the tree. Just the right look for our little coastal Christmas tree. Until the other night when I came home to … continue reading